Friday, June 22, 2012

Create Ghost Bootable SD Card or USB Flash Drive


It's a good practice to create an image of your hard drive before you start using it. Especially when you had to build that computer from scratch and spent hours installing the operating system and all of your favorite apps...

As Symantec Ghost becomes more user friendly, people start to recognize this idea. The idea also works well when you need to clean your PC from viruses. In case anything goes wrong with the operating system, you just need to restore the image using the Symantec bootable CD.

However, the problem comes when we deal with the new version of those small laptops: The netbooks! which usually don't come with a built-in CD-ROM drive to bootup the PC.
The most simple solution would be buying an external CD-ROM drive, which costs you money. And in some cases, you just want to bootup the Symantec Ghost.... with whatever available!


The good news: Almost every recent laptop/netbook comes with a card reader, and even if you wasn't lucky enough, your laptop/netbook should have a USB port!

This guide will tell you how to create a bootable SD card or a USB flash drive with Symantec Norton Ghost.
This task can be done with several different versions of Symantec Ghost; however, the steps from this articles are based on Symantec Ghost 14.


What you need?
  • Symantec Ghost 14 bootable CD. (Some other versions might also work)
  • A PC with bootable CD/DVD drive.
  • An SD card (either SD or SDHC), or a USB thumb drive. The size can be as minimum as 1 GB. You can also pick a large SD card if you want to store your hard drive image to the card as well.
  • An SD slot or a card reader (for SD card) or a USB slot (for thumb drive)

Follow the steps in order. Use this guide at your own risks.

  1. First, check to make sure your CD/DVD drive is bootable. (See your BIOS manual or PC user guide for details since this is out of the scope of this article).
  2. - For SD card: Make sure the SD slot or the card reader is available. if it's a card reader, connect it to the PC. Also insert the card.
    - For USB thumb drive: Make sure the drive is inserted into one of the USB slots.
  3. Bootup the computer using the Symantec Ghost CD (Details vary on different computers). On Windows XP, during the startup, you should see the prompt "Press any key to boot from CD...".
  4. Once the Symantec Recovery startup is complete, you should see the main screen of Symantec Ghost 14 Recovery similar to this image:


  5. Select "Analyze" from the left menu.

  6. Then click on "Open Command Shell Window". A command prompt window will display.
  7. At this command prompt window, type: "diskpart" (one word, without quotes) and hit enter. The prompt now changed to "DISKPART>"
  8. Now type "list disk" and hit enter. You should now see a list of all available disks. Base on the size of each disk listed, find the one that matching your SD card (or thumb drive) and note its disk number under "Disk ###". If you don't see your SD card (or flash drive) listed, verify if it is inserted or plugged in (you might need to restart the computer and try again).
  9. Type "select disk " (replace with the disk # noted from the previous step) then hit enter.
    Important!! Besure to select the correct disk (your SD card or thumb drive) as you will be erasing the drive.
    Sample image with a 4-GB SD selected:


  10. Create a primary partition for the the disk by executing the following sequence of commands:
    clean
    create partition primary
    select partition 1
  11. Set the primary partition active, type: "active" and hit enter
  12. Perform a quick format with the following command:
    format fs=fat32 quick
  13. Then type:
    assign
    exit
  14. Your SD card (or the flash drive) is now bootable and will act similar to a local hard drive. In order to boot this card with Symantect Ghost Recovery, copy all contents from the Symantec Ghost disc to the SD card (or the flash drive). Besure to copy everything including any hidden files/folders.

    The SD card or flash drive is now bootable and will boot your laptop/netbook to Symantec Ghost Recovery utilities exactly the same way as of the CD (To boot with the card on your laptop/netbook, don't forget to set your bios to search for the SD card or USB external devices in the boot sequence).

Burn ISO Image to CD or DVD


Ok, I have an ISO file, now what? I can't see the files or folders inside although I copied it to a CD/DVD... Well, an ISO file is an image of a CD or DVD, simply copy it to a CD or DVD as a data file won't be enough. You can think of an ISO image as a "compressed" file. For a CD/DVD ISO, you'll need to burn it out to a blank disc, but with the "image burning" option. Most current burning applications come with this option, and they'll all do the same thing: Extract the files to a temporary location then burn them to CD/DVD.
One big advantage of using ISO image file for CD/DVD is, the image file contains all files/folders and the structure of the CD/DVD, including the hidden sectors, for example, the boot sectors. Some CD/DVD are "bootable", which means you can use the CD/DVD to startup your pc and run some installations or utility. With this kind of CD/DVD, when you view the contents in Windows, you won't see the bootable portion. And when you make a copy of the CD/DVD using the normal method for files, the bootable sectors will NOT be included. However, the Image method will take care of that.
With that said, when you're making a copy of your CD/DVD and you are not sure if the CD/DVD has some hidden contents or bootable sectors, then you better use the ISO image method to make sure everything gets copied.
This page shows you how to burn the ISO image back to CD/DVD, assume that you already have an ISO image is an image created from a CD/DVD.
For instructions how to create an ISO image from a CD/DVD, click Here.
The steps of burning an ISO image to CD/DVD are different depending on which tool you use. However, the following key points should be the same:
  1. Insert a blank CD/DVD.
  2. Open the burning tool.
  3. Select the burning option for ISO/image.
  4. Browse to the ISO/image file.
  5. Burn to CD/DVD.

Detailed Steps
The following sample instructions use Free Easy CD/DVD Burner v1.2. This is a free burning tool with advertising supported, but no spyware or adware. You can download this program from Softpedia, or v4.2 here
  1. If you have not installed a burning program, download the tool above and install it. Make sure to reboot after the installation.
  2. Insert a blank CD/DVD.
  3. Open the Free Easy CD DVD Burner program.
  4. Click on the "Copy CD/DVD" button on the top.

  5. Under the "Action" menu on the left, click the "Burn an image file" link. (Note that if this link is not selectable, then you might have no (or invalid) blank CD/DVD in your drive.)

  6. The window "Select the image file that you want to burn" opens, browse to the ISO file you wish to burn and click "Open".

  7. A dialog box will appear asking "Do you want to burn...", cilck "OK" to confirm.
  8. The burning process will start to extract files and burn to your CD/DVD. This process will take a few minutes depending on the size of the ISO file and the speed of your burner.

Create an ISO Image from a CD/DVD

 This trick provides information how to create an ISO image file from a CD/DVD.
Why?
One big advantage of using ISO image file for CD/DVD is, the image file contains all files/folders and the structure of the CD/DVD, including the hidden sectors, for example, the boot sectors. Some CD/DVD are "bootable", which means you can use the CD/DVD to startup your pc and run some installations or utility. With this kind of CD/DVD, when you view the contents in Windows, you won't see the bootable portion. And when you make a copy of the CD/DVD using the normal method for files, the bootable sectors will NOT be included. However, the Image method will take care of that.
With that said, when you're making a copy of your CD/DVD and you are not sure if the CD/DVD has some hidden contents or bootable sectors, then you better use the ISO image method to make sure everything gets copied.
The general way to make copy of a CD/DVD with hidden contents (i.e. boot sectors) is: (1) Create an ISO image of the CD and store it in local hard drive, then (2) Burn the image back to a blank CD/DVD.
This page shows you how to create an ISO image file from a CD/DVD.
For instructions how to burn the ISO image back to CD/DVD, click Here.
The steps of burning an ISO image to CD/DVD are different depending on which tool you use. However, the following key points should be the same:
  1. Insert the CD/DVD which you want to create the image from.
  2. Open the burning tool.
  3. Select the save ISO/image option.
  4. Browse to the destination location to save the ISO/image file.
  5. Execute the image capture.

Detailed Steps
The following sample instructions use Free Easy CD/DVD Burner v1.2. This is a free burning tool with advertising supported, but no spyware or adware. You can download this program from Softpedia, or v4.2 here
  1. If you have not installed a burning program, download the tool above and install it. Make sure you reboot after the installation.
  2. Insert the CD/DVD with contents, which you want to create the image from.
  3. Open the Free Easy CD DVD Burner program.
  4. Click on the "Copy CD/DVD" button on the top.

  5. Under the "Action" menu on the left, click the "Copy on your hard disc" link. (Note that if this link is not selectable, then you might have no (or invalid/blank) CD/DVD in your drive.)
  6. The window "Save your disc as..." opens, browse to the location where you want to save the ISO file. Enter the name of ISO file as you wish to save in the box "File name:" then click "Save".

  7. The main screen of Free Easy CD/DVD Burner program comes back with the burning process started.
  8. When the process completed, the message "Image Writing Completed!" displayed.

  9. Note that this ISO file can be burned back to the CD/DVD only with the ISO option. Burning this ISO file to CD/DVD using the data file method will not extract the files and folders to CD/DVD.

Create Ghost Bootup with Network


This trick shows you how create Symantec Ghost bootup floppy disks with Network option. With the network option, you can access the network resources and use the GhostCast feature to perform backup/restore via the network. The instructions based on Ghost 8, but similar procedures can be done on different versions of Ghost.
If you're looking for the instructions how to create a standard Symantec Ghost Bootup (i.e. without Network), click Here instead.
Or if you're looking for the instructions how to create a Ghost Bootup CD from the two floppy disks, click Here instead.
Use this trick at your own risk.

Here's how
  1. Open the "Symantec Ghost Boot Wizard".

  2. Select "Network Boot Disk" and click "Next".

  3. At the screen "Symantec Ghost Boot Wizard - Network Interface Card", select an appropriate driver for your network card. If you need more details on a driver, click on it and select "Modify".
    If you don't see your network card listed, follow the next step to add a new one; otherwise, select your network card and click "Next" (and skip to step 9).


  4. To add a new driver, search and download your driver from the internet. Make sure you download a "DOS" driver. A "Packet Driver" usually comes with a ".COM" file or ".EXE" file. A "NDIS2 driver" usually comes with a ".DOS" file.
  5. Click "Add" on the screen "Symantec Ghost Boot Wizard - Network Interface Card" to bring up the "Template Type" dialog.

    Select "NDIS2 driver" or "Packet Driver" depending on what you have. (You probably have more luck searching a "NDIS2 driver" - file with ".DOS") then click "OK".

  6. At the screen "Template Properties", click on the "Browse..." button and browse to your driver. Then enter a name for "Driver Name". A driver name should be very simple and must end with a "$". For example, you can take the first few letter of your driver file and add the "$":

  7. Click "OK" to go back to the screen "Symantec Ghost Boot Wizard - Network Interface Card"
  8. The "Name" field of the new driver should be editable. Go ahead to change this name the way you want. This name is just to help you recognize it from the list. Then click "Next".

  9. Click "Next" on the next screen to "Use PC-DOS".
  10. On the next screen, you'll need to specify where the file "ghost.exe" is located. This file is normally installed to a path as example below, but you should double check. Then click "Next".

  11. Click "Next" on the next screen to use default options for external storage devices.
  12. On the next screen, you'll need to specify the Tcp/ip options. The Tcp/ip can be either "Automatic IP" (or "DHCP"), or "Static IP".
    If you plan to run Ghost on multiples computer on a same network at a same time (using GhostCast), you should specify a static IP for each CD to avoid conflicting. Otherwise, you can always select "DHCP will assign the IP settings". Then click "Next".
  13. Click "Next" on the next screen:

  14. Click "Next" on the Review screen:

  15. A message will display telling you that you will need two floppy disks. Click "OK".
  16. The Boot Disk Wizard will start to erase your floppy and create the boot data. Once it's done with the first disk, it will prompt for a second one.

Create Ghost Bootup CD from 2 Floppies


This trick shows you how create a Ghost bootup CD from two floppy disks. The instructions based on Ghost 8, but similar procedures can be done on different versions of Ghost.

Why?
Symantec Ghost is an utility to backup/restore hard drives and partitions. The backup feature requires a "fresh" bootup that is done by using bootup disk(s). This way, no Windows programs are executed providing the backup process a full access to all files and folders, including system files.

Because of this, Symantec Ghost normally comes with a bootup wizard which allows users to create the bootup disks; however, the wizard only allow you to create bootup floppy disks, and in many situations, you would have a tough time using the floppies. The reasons can be the speed, bad performance, or the lifetime concern of the floppy disks... Would it be cool if you can create a CD out of those floppies and worry free?
This page does not provide instructions how to create Ghost boot disk, it only helps you how to create a bootup CD out of the two floppies. For instructions how to create Symantec Ghost Boot Disk, click Here.
Use this trick at your own risk.

Here's how
  1. Create the two Ghost bootup floppy disks. (Click Here for details).
  2. Let's call the first bootup floppy is "Disk #1" and the second disk is "Disk #2".
  3. With "Disk #1", Create (if not already exists) a file called "mouse.ini".
  4. With "Disk #1", open the file "mouse.ini" with Notepad, and add the following lines:
    [mouse]
    MouseType = PS2

  5. To enable the CD-ROM driver (so that the CD-ROM can be accessible), search for the files "OAKCDROM.SYS" and "MSCDEX.EXE" from your computer and copy them to "Disk #1".
    If you cannot find these files, you can download them here, then extract them to "Disk #1".
  6. With "Disk #1", open the file "CONFIG.SYS", then edit this file so that it looks like follows. (Note! If you created the the bootup floopy disks WITHOUT a network driver, use only the first and the last line from below, remove all the lines which start with "DEVICE=\net\")
    DEVICE=OAKCDROM.SYS /D:mscd001
    DEVICE=\net\protman.dos /I:\net
    DEVICE=\net\dis_pkt.dos
    DEVICE=\net\EL90x.dos
    LASTDRIVE=Z:

  7. Still with the same file, edit the line "DEVICE=\NET\EL90x.dos" above to the appropriate driver file.
    (Note! "EL90x.dos" is a driver file for 3COM 90x NIC. Look under the "net" folder of your first floppy to find out the right name of this driver file. This file only exists in the first disk if the floppy set has been created with Network option).
  8. With "Disk #1", open the file "AUTOEXEC.BAT" with notepad. Edit the file to have it loads the CD-ROM driver, mouse driver, and launch GHOST.EXE as example below.
    (Note! If the bootup is not Network enable, remove the line "\net\netbind.com").

    Sample AUTOEXEC.BAT file:


  9. Create the CD with bootable option. This can be done with any recording software (i.e. Nero).
    Use "Disk #1" as boot image.
  10. Create a new folder on the CD contents, called "ghost", then add the executable file "Ghost.exe" into the folder from "Disk #2" ("Ghost.exe" must be in the "ghost" folder since we have created the "AUTOEXEC.BAT" script to look for this file there.)
  11. Congratulation! the CD you have created is a Symantec Ghost bootable CD. As long as you have CD-ROM bootup enable, you can use this CD to bootup your computer and use the Ghost tools. 

Create a Standard Ghost Bootup


This trick shows you how create a standard Symantec Ghost bootup floppy set (i.e. without Network). The "Standard Ghost Boot Disk" option from Symantec Ghost allows you to create a set of 2 bootable floppy disks to use with Ghost tools for backup/restore hard drives and partitions.
The "Standard Ghost Boot Disk" does not allow you to access the network resources (i.e. GhostCast), but it does allow you to read and write from your CD-ROM and DVD drives as well as USB external drives.
If you're looking for the instructions how to create a Network Ghost Bootup, click Here.
Or if you're looking for the instructions how to create a Ghost Bootup CD from the two floppy disks, click Here.
Use this trick at your own risk.

Here's how

  1. Open the "Symantec Ghost Boot Wizard".

  2. Select "Standard Ghost Boot Disk" and click "Next".

  3. Leave the default options as is and click "Next".
    Note that even though you are not selecting the "USB Support" option on this screen, you'll still be able to access your USB external devices. The "USB Support" option here is for "Peer-to-peer".

  4. Click "Next" on the next screen to "Use PC-DOS".
  5. On the next screen, you'll need to specify where the file "ghost.exe" is located. This file is normally installed to a path as example below, but you should double check. Then click "Next".

  6. Click "Next" on the next screen to use default options for external storage devices.
  7. Click "Next" on the next screen:

  8. Click "Next" on the Review screen:

  9. A message will display telling you that you will need two floppy disks. Click "OK".
  10. The Boot Disk Wizard will start to erase your floppy and create the boot data. Once it's done with the first disk, it will prompt for a second one.

Tuesday, June 19, 2012

Gmail Settings for Outlook

Outlook 2007/2010

  • Follow the instructions below to set up IMAP1 access in Outlook 2007/2010.
  • Google Apps users, please follow the default instructions unless otherwise noted, replacing 'your_domain.com' with your actual domain2 name.
To set up your Outlook 2007/2010 client to work with Gmail:
  1. Enable IMAP in Gmail. Don't forget to click Save Changes when you're done.
  2. Open Outlook.
  3. For new setups, select Do not upgrade.
  4. Click Yes.
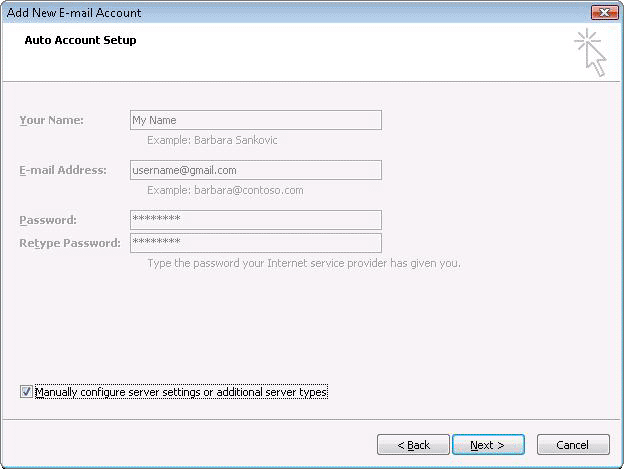
  5. Enter your display name, email address (including '@gmail.com'), and password. Google Apps users, enter your full email address, e.g. 'username@your_domain.com.'
  6. Select the 'Manually configure server settings or additional server types' checkbox.
  7. Select Internet E-mail.
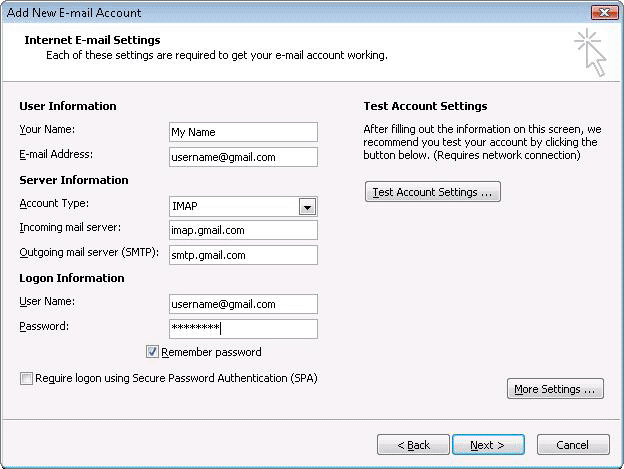
  8. Settings: name, full email address (including '@gmail.com' or '@your_domain.com')
    • In the Account Type dropdown menu, select IMAP. In the 'Incoming server name' section, enter: imap.gmail.com and in the 'Outgoing server name (SMTP)' section, enter: smtp.gmail.com.
    • In the 'User Name' field, give your full Gmail address, including '@gmail.com' or '@your_domain.com.'
    • After creating these settings, clicking Next takes you to the end of the setup.


  9. In the Tools menu, select Options then Mail Setup. Under 'Email Accounts,' click E-mail Accounts.
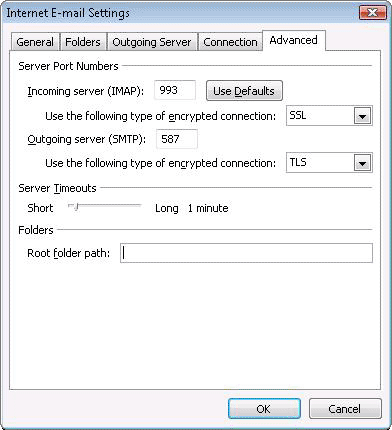
  10. Select an account, and click Change above the list of accounts. Click More Settings, then the Advanced tab.
    • Incoming server must be 993, and must use SSL3 encryption.
    • Outgoing server can use 587, TLS4 encryption.
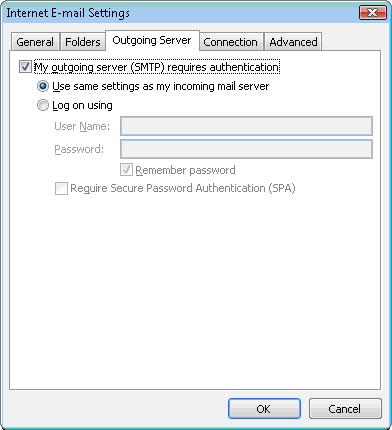
  11. Click the Outgoing Server tab. Make sure that 'My outgoing server (SMTP) requires authentication' is selected. The radio button 'Use same settings as my incoming mail server' should also be selected.
  12. Click OK > Next > Finish > Close > OK.
  13. Check our recommended client settings, and adjust your client's settings as needed.
  1. IMAP: IMAP (Internet message access protocol) lets you download messages from Gmail so you can access your mail with a program like Outlook Express or Apple Mail. IMAP syncs the actions you take in Outlook Express or Apple Mail with Gmail so if you read a message in your mail client, it'll be marked as read in Gmail.
  2. domain: A domain is a name for an IP address and is more commonly recognized as a website or web address. For example, Google.com is a domain.
  3. SSL: SSL (secure socket layer) is a way of changing data such as your username and password into code as it travels across the Internet, so that the data will be secure and private.
  4. TLS: TLS (Transport Layer Security) is a way of changing data such as your username and password into code as it travels across the Internet, so that the data will be secure and private. With mail delivery, TLS begins with an unsecured connection to the mail servers, and then upgrades to a secure connection once information is sent.