Tuesday, December 27, 2011

How to Create a Google Account


If you want to use Google Blogger to create your blog, you need to create a Google account to access the Blogger software. You can easily create your Google account (and your Blogger blog):
1

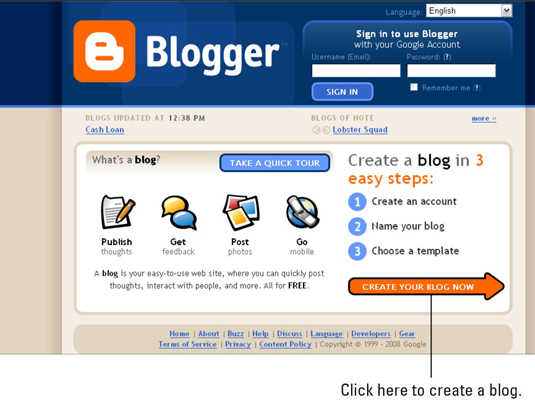
Visit the Blogger home page.

If you already have an account, you can also sign in from this page.
2

On the Blogger home page, click the Create Your Blog Now button.

The Create a Google Account page opens.
3

On the Create a Google Account page, type your e-mail address in the Email Address text box, and then retype it in the Retype Email Address text box.

The e-mail address you use doesn't have to be for a Google Gmail account. You can use any e-mail address to create a Google account to access Blogger. The e-mail address you enter is the one you use to log in to Blogger, and it's the one to which Blogger sends your username and password if you forget them.
4

Enter a password in the Enter a Password text box, and then reenter it in the Retype Password text box.

You can change your password later, if you want. Google shows you, just beneath the Enter a Password box, howstrong your password is (how difficult it would be for someone to figure it out) after you enter it.
5

Enter your display name in the Display Name text box.

Your display name appears at the bottom of each of your blog posts, indicating that you're the author of the post.
6

Type the letters displayed in the Word Verification box.

This security procedure ensures that new Google accounts are created by human beings, rather than by automated spam systems.
7

Select the check box in the Acceptance of Terms section to indicate that you accept Blogger's terms of service.

You can click the Terms of Service link on your screen to read the complete document.
8

Click the Continue button.

The Name Your Blog page opens on the Blogger Web site.

How to Select a Blog Template through Blogger


To choose your blog template when you use Google Blogger, you don't have to look outside Blogger itself. Blogger users can choose from a variety of templates that you can access by using the Blogger dashboard:
1

Sign in to your Blogger account.

Your Blogger dashboard opens.
2

From the Blogger dashboard, click the Layout link for your blog.

The Layout configuration page for your blog appears.
3

Select the Pick New Template tab from the navigation bar to open the Select a New Template for Your Blog page.

Each template available from Blogger includes a Preview Template link beneath the template choice box.
4

Click the radio button next to the name of the template you want to preview, and then click the Preview Template link beneath the template box.

A new window that displays your existing blog, formatted with the new template, appears.
5

Click the Close button in the upper corner of the preview window to close it.

The Select a New Template for Your Blog page reappears.
6

Repeat Steps 4 through 6 until you find a template that you like.

Take your time previewing all the different template options that are available from Blogger, to find the one that works best for your blog. Your changes are not final until you click the Save Template button.
7

Click the Save Template button to save your blog with the template you chose.

You can then click the View Blog link to see your changes live on your blog.
Because the Blogger templates are available for free to every Blogger user, the downside to choosing one is that it doesn't make your blog unique. In other words, your blog might not stand out in the crowded blogosphere.

How to Use a Custom Blogger Template


To use a third-party custom template on your Blogger blog, you need to download that template to your computer and then upload it to your Blogger account. Get your custom third-party template onto your Blogger blog:
1

Download the custom blog template to your hard drive.

The custom blog template's designer or Web site should include explanation about how you can download the template.
2

Log in to your Google Blogger account.

Your Blogger dashboard appears.
3

Select the Layout tab from the Blogger dashboard.

The Page Elements page opens.
4

Select the Edit HTML tab from the navigation bar to open the Backup/Restore Template and Edit Template page.

This page offers options to change your template.
5

Click the Download Full Template link under the Backup/Restore Template heading.

The File Download dialog box appears. Backing up your template is an essential step if you think that you might want to revert later to the exact template you were using previously .
6

Click Save.

The Save As dialog box appears.
7

Navigate to the folder on your hard drive where you want to save a copy of your existing blog template and give the file a recognizable name.

Choose a location where you can find the template file if you want to use it again later or create a new folder called My Blog Backups.
8

Click Save.

The Save As dialog box closes, and the template backup file is saved in XML format in the folder you chose.
9

In the Backup/Restore Template and Edit Template page, click the Browse button, which appears next to the Upload a Template from a File on Your Hard Drive text box.

The Choose File dialog box appears. Locate the XML file for the new template you downloaded to your hard drive in Step 1.
10

Select the file, and then click the Open button.

The file path for the XML file you just selected appears in the Upload a Template from a File on Your Hard Drive text box.
11

Double-check the file you selected.

Make sure it's the file you want!
12

Click the Upload button.

Your new template is uploaded to your Blogger account.
13

Click the Confirm & Save button.

The new HTML code for your third-party template now automatically appears in the big box in the Edit Template section of the page.
14

After your new third-party template is uploaded, click the View Blog link to review the look of your blog.

You might want to modify your blog's page elements after you upload your third-party template. For example, you might need to clean up your blog by changing the order of your profile, updating the archives in your sidebar, or adding a graphical image to your header.