Saturday, July 7, 2012

How To Change Security Question On Facebook For Account Security 2012


You can change your facebook security question by following these steps.

For this first go to facebook.com and click on Forgot your password?
and then on the below screen enter your email or username then click on search.


when they found you, on below screen click on This is My Account


On next screen click on "No longer have access to these"


On next screen they'll ask you for a new email-id, enter email-id and click on submit


Next they will ask you current answer to security question, enter it and click on submit


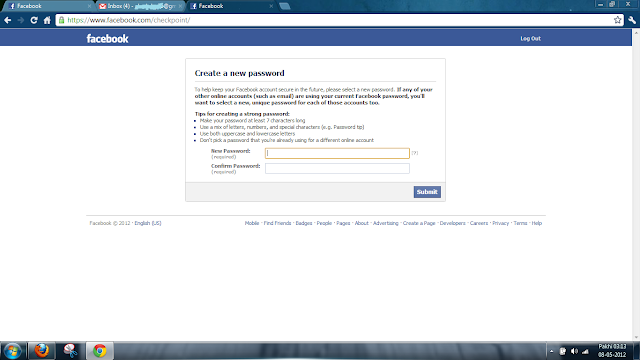
On next screen enter new password (but do remember your old password for this trick)


Now a message will so that your identity is proven


Once your password is updated on previous screen open one more tab in your browser open facebook.com.and login with your old passward. Then a message will so you that your account is temporarily locked. Click on "This wasn't me".


Then on next screen secure your account, click on"Secure my account".


Now click on continue


On next screen, create new password (remember this one )


now click on continue.


select your email and click on submit.


check "Only I know the password for *******"
(change your email account's password if needed)
click on continue


Don't wanna remove any app you use one facebook just click on continue

Now a screen shows that Set a new security question.now you can change your security question and
answer update it and click on submit


.your account is unlocked


Now You Can Login with your new password.


Lets enjoy friends....

Friday, July 6, 2012

Share wireless settings on a flash drive


I like to keep my wireless network secure. Too easy for neighbors to pick up my passwords, and info just by connecting to my network. Worse yet, they could download pirated music or cause all kinds of trouble on my Internet connection.
The problem with having a complex password is that it is hard for visitors to enter into their computer. Wife has some friends over, they need to use the Internet.
I am at the office. I get the phone call – “Ok, type 659872323865765798798756. Oh Sorry. It is 6. Then 5. Then 9. Oops lets start over”
Yea, not so fun when it happens a lot.
I found an easy way to share your Wireless settings from Windows 7 (A Windows XP machine can import them).
Start out by clicking on the wireless icon down by the time:
Wireless Tray Icon
Then click on “Open Network and Sharing Center”
That will open a big ole window:
Manage Wireless Networks
Find the option that says “Manage Wireless Networks” and click on it.
Now you should see a list of your wireless networks. Right click on the one you want to share and click properties:
Wireless Network Properties
Now, another window will pop up. Look for the option that says “Copy this network profile to a USB Flash Drive”
Save Wireless Settings To Flash Drive
Walk through the wizard that shows up:
Copy Network Settings
Once it is complete, it will place a program on the flash drive:
Import Network Settings
Now – To add the wireless network to a Windows machine, you just run that application and it connects automatically. From that point on, the wireless key is saved in its settings.

Calculate folder size from the command line


Even with the huge amount of space that I have, I am always running out. When that happens I start digging.
Usually I wait through this:
Folder Properties
If you have more than just a few folders, it can be a huge waste of time.
I ran across a free tool from Microsoft called “Disk Usage”
It is a command line tool. Point it at any folder, and get the same information:
Folder Properties DU
With one catch – it is much faster than using Windows Explorer ;)
For example, I went to the properties of a development folder on our server. It took 1 minute and 10 seconds to get the total size.
With Disk Usage it took 15 seconds.
The next part I am about to show you is even better. It is the real reason I love this tool. If you use the -v option, it will show you a breakdown of how much each sub folder is taking up:
Folder Disk Usage
Now with a quick glance, I can see what folders are taking up the most space. From there I can investigate and clean out anything that is not needed.

Configure Windows 2008 Core server with a GUI


Windows Server Core is a stripped down version of 2008. It has no explorer, and most GUI functionality is removed.
A great solution when you don’t want any extra software running on a production server.
Soo much is missing that it can get frustrating when you just want to make a few changes before you put the server into production.
When you boot, it simply launches a command line:
Windows 2008 Core R2 GUI Config
With the latest version, it has improved…they do include a console interface to make configuration changes:
Windows 2008 Core R2 Cmd Line Config
Still, that is too limited, and leaves you frustrated
You end up having to go through a lot of hoops to even make simple changes.
There is an answer to this – The Windows 2008 Server Core Configurator.
It comes in the form of an ISO, so you can burn it to a CD or add it to your VMWare storage.
Once you mount the ISO, or pop in the CD, you can launch it from the command line like this:
start_coreconfig
The first time you run it, it will check to make sure it has all of the software needed to run…namely powershell.
Once it is done, it launches – then you can easily make your configuration changes:
You can change network settings
Windows 2008 Core Server Network Configuration
Firewall
Windows 2008 Server Core Firewall Configuration
Remote Desktop
Windows 2008 Server Core Remote Desktop Configuration
Services
Windows 2008 Server Core Services Configuration
And much more. The best part is, you make your changes pop out the CD and it leaves nothing behind.
You can download it for free from here:

Get the start menu back in Windows 8

I have been playing around with Windows 8 a lot lately. As I browse the forums at Microsoft, I have realized that they are not going to bring the start menu back. No matter how much people complain, they simply refuse.
I heard there is a registry hack that can bring the start menu back. I have not tried it, but I heard it still works.
Microsoft promises this will be removed in the final release.
So what to do? Windows 8 does seem better in many ways. It boots faster, many of the supporting applications like task manager have been given a complete overhaul and are great.
I still feel like my hands are tied behind my back with the start menu gone. No matter how long I use the new metro start screen, it still is not as efficient as the 17 year old start menu.
I found the perfect answer. It is called classic shell. It is a free utility that brings back the start menu goodness.
You start out by downloading the latest version from here:
After that see the small but important change.
Windows 8 Before:
Windows 8 No Start Menu
Windows 8 After:
Windows 8 With Start Menu
Yea, I admit that button looks like the logo for a well known gas company, but thing is so customizable you can even change that if you want.
There are a bunch of skins you can choose from.
You can get that Windows 7 look:
Windows 8 With Windows 7 Start Menu
The Windows XP style:
Windows 8 With XP Start Menu
Or old school:
Old School Start Menu
The best part is now that you have the start menu, important things are not hard to find (Or many clicks away). All your settings can be easily reached just like in the old versions of Windows:
Windows 8 Control Panel
I almost forgot – the most revolutionary idea of all. A way to shutdown without playing hide and seek with your computer (If you have used Windows 8 on a non-touch computer you will understand this completely):
Windows 8
All of it you can change. It has so many options you can spend hours tweaking it to get it just right for your desktop:
Classic Shell Options
Just like Vista I believe the time will come when you are forced into it. Need to purchase a few machines for accounting? Oh sorry only Windows 8 can be pre-installed.
At least with the classic shell you can configure these systems so you don’t have re-train all your users.

Configuring the Windows Time service to use an internal hardware clock


Serious problems might occur if you modify the registry incorrectly by using Registry Editor or by using another method. These problems might require that you reinstall your operating system. Microsoft cannot guarantee that these problems can be solved. Modify the registry at your own risk.

To configure the PDC master without using an external time source, change the announce flag on the PDC master. The PDC master is the server that holds the forest root PDC master role for the domain. This configuration forces the PDC master to announce itself as a reliable time source and uses the built-in complementary metal oxide semiconductor (CMOS) clock. To configure the PDC master by using an internal hardware clock, follow these steps:

1. Click Start, click Run, type regedit, and then click OK.
2. Locate and then click the following registry subkey:
HKEY_LOCAL_MACHINE\SYSTEM\CurrentControlSet\Services\W32Time\Config\AnnounceFlags
3. In the right pane, right-click AnnounceFlags, and then click Modify.
4. In Edit DWORD Value, type A in the Value data box, and then click OK.
5. Quit Registry Editor.
6. At the command prompt, type the following command to restart the Windows Time service, and then press ENTER:
net stop w32time && net start w32time

System Restore Script


Set IRP = getobject("winmgmts:\\।\root\default:Systemrestore" ) MYRP = IRP।createrestorepoint ("Admin Restore Point", 0, 100)

VBScript to Display Logical Disk Information

Instructions for your Logical Disk Information WMI Script

Copy and paste the example script below into notepad or a VBScript editor.
Decide which machine on your network to interrogate and then change line 10:
strComputer = "NetworkMachine" to the name of that machine. Alternatively change strComputer to the local machine by substituting a period or "." strComputer = "."
Save the file with a .vbs extension, for example: LogicalDisk.vbs
Double click LogicalDisk.vbs and check the properties of each partition.

Script to Interrogate Logical Disk
' LogicalDisk.vbs
' Sample VBScript to interrogate a Logical disk with WMI
' Author Guy Thomas http://computerperformance.co.uk/
' Version 1.8 - November 2005
' -------------------------------------------------------------'
Option Explicit
Dim objWMIService, objItem, colItems, strComputer 

On Error Resume Next
strComputer = "."

Set objWMIService = GetObject _
("winmgmts:\\" & strComputer & "\root\cimv2")
Set colItems = objWMIService.ExecQuery _ 
("Select * from Win32_LogicalDisk")

For Each objItem in colItems
Wscript.Echo "Computer: " & objItem.SystemName & VbCr & _
" ==================================" & VbCr & _
"Drive Letter: " & objItem.Name & vbCr & _
"Description: " & objItem.Description & vbCr & _
"Volume Name: " & objItem.VolumeName & vbCr & _
"Drive Type: " & objItem.DriveType & vbCr & _
"Media Type: " & objItem.MediaType & vbCr & _
"VolumeSerialNumber: " & objItem.VolumeSerialNumber & vbCr & _
"Size: " & Int(objItem.Size /1073741824) & " GB" & vbCr & _
"Free Space: " & Int(objItem.FreeSpace /1073741824) & _
" GB" & vbCr & _
"Quotas Disabled: " & objItem.QuotasDisabled & vbCr & _
"Supports DiskQuotas: " & objItem.SupportsDiskQuotas & vbCr & _
"Supports FileBasedCompression: " & _
objItem.SupportsFileBasedCompression & vbCr & _
"Compressed: " & objItem.Compressed & vbCr & _
""
Next

WSCript.Quit

' End of Sample DiskDrive VBScript

Cross Cable


This picture shows the wiring of a cross cable

How can I limit the number of allowed concurrent sessions per user in an Active Directory (AD) domain?

http://download.microsoft.com/download/f/d/0/fd05def7-68a1-4f71-8546-25c359cc0842/limitlogin.exe. 
The tool stores logged-on information in a custom AD partition (dc=limit login, dc=, dc=; e.g., dc=limitlogin,dc=savilltech,dc=com) via a Microsoft IIS 6.0 (Windows Server 2003) hosted Web service, a client component, and a logon and logoff script.

After you download the file, extract the setup files to a folder you specify. The full configuration requires a change to the AD forest schema to allow extra detail about the logon status to be stored, and because an AD application partition is being created, the system must have at least one Windows 2003 domain controller (DC).
(i)To install Limit Login, perform these steps:
1.Use the Add/Remove Programs Control Panel applet to install IIS and ASP.NET on the
server that will act as the Limit Login Web service host (Add/Remove Programs -
Windows Components - Application Server).
2.Enable ASP.NET as an extension via the Internet Information Services (IIS) Manager
in the Web Service Extensions navigation pane. Ensure that the ASP.NET extension
is shown as Allowed in the detail pane, as the figure shows.
3.Execute the LimiLoginIISSetup.msi from the extraction folder to begin setup of the
Web service portion of limit login. (You must be logged on as an Administrator.)
Click Next to the welcome dialog box.
4.You'll be prompted to enter a virtual directory name that the Web service will use
and the port (you can usually leave the default settings for these) and click
Next.
5.Click Next, then click Close to complete the Web portion of the setup. If you look
at IIS Manager, you'll see a new WSLimitLogin directory under the Default Web
Site.
6.To prepare AD, execute the LimitLoginADSetup.msi file and click Next at the
introduction screen.
7.Click "I Agree" to the license agreement and click Next.
8.Select the installation folder (the default is C:\program files\limit login), and
click Next.
9.The AD setup will prompt you to prepare the forest and domain and install the MMC
Limit Login snap-in, as the figure shows. Click Next. (You must be logged in as a
Schema Admin at this point and have the Schema Master FSMO available.
10.The installation will prompt you to ensure that you have sufficient permissions
to write to the schema. Click OK.
11.You'll see a dialog box that shows that the changes completed successfully for
the forest portion (the schema change) of the setup. Click OK.
12.Specify the name of the IIS server and a folder in which the scripts can be
stored, as the figure shows. You must have already created the share (it can be
hidden), and make sure authenticated users have read access to the share. Click
Next.
13.Select the DC (must be Windows 2003) that will host the application partition for
Limit Login, as the figure shows. Click Next.
14.You can now enter credentials used to create the partition or clear the "Use the
following credentials" check box if your logged on user has sufficient
credentials. Click Create.
15.Click OK to the successful creation message.
16.You now need to manually copy the LimitLogin.wsdl, llogin.vbs and llogoff.vbs
from the C:\program files\limit login\scripts folder to the share you specified
in step 12. In the Final Steps message box, select the "I've read the
instructions and will perform these steps manually" checkbox, as the figure
shows. Click Next.
17.Click Close.

(ii)You now need to deploy the LimitLogonClientSetup.msi to the machines in your environment via a logon script, Group Policy, or Microsoft Systems Management Server (SMS) because this installation file contains the client-side piece that communicates with the IIS-based Web service.
You also need to configure Group Policy to execute the llogin.vbs and llogoff.vbs scripts.
You can do this at domain level by performing these steps:
1.Create a new Group Policy Object (GPO) called "Limit Logon" and link it at a
domain level, as the figure shows. (Open the Active Directory Users and Computers
MMC snap-in, right-click the domain level, and select Properties. Select the Group
Policy tab and click New. Enter a name of Limit Logon.)
2.Click Edit on the Policy tab to open Group Policy Editor (GPE).
3.Navigate to the User Configuration - Windows Settings - Scripts (Logon/Logoff)
branch.
4.Double-click Logon in the right pane and click Add.
5.Enter the script name and location from the share ( e.g., \\savdaldc01
\limitlogon$\llogin.vbs) and click OK.
6.Double-click Logoff in the right pane and click Add.
7.Enter the script name and location from the share (e.g., \\savdaldc01
\limitlogon$\llogoff.vbs) and click OK.
8.Close GPE.

This process creates in the C:\program files\limitlogin folder the LimitLoginMMCSetup.exe utility, which, when run, integrates Limitlogin directly into the AD Users and Computers snap-in, providing a new Limitlogin Tasks context-menu option. This option opens the LimitLogon configuration for the user, which displays the current sessions, as the figure shows. (You'll need Limitlogin installed on each machine that runs Active Directory Users and Computers. To do so, execute the LimitLoginADSetup.msi file and during the setup options, select the "Install Limitlogin Active Directory MMC snap-in integration tools on this machine" option).
Click Configure to set the number of logons allowed, as the figure shows.
Limitlogin also provides a script--Bulk_LimitUserLogins.vbs--that lets you define quotas for all users in the domain. If you want to use this tool simply to see logged-on sessions, give users a high quota limit (without quotas enabled no user-session tracking occurs) that they'll never reach.
Any attempt to log on more than the allowed number of sessions will result in the user being logged off and an event ID 8811written to the Application event log of the LimitLogon server, as the figure shows.
Read the Help file that accompanies the Limitlogin tool. It has a lot of details about using the tool. Also be aware that some antivirus and antispyware packages might try to block the scripts from running so you need to configure the programs to allow the scripts to run.

Configuring the WSUS Client by Group Policy

The quickest and easiest way to configure systems to auto-update using Windows Server Update Services (WSUS) is to use group policy within Active Directory. This document assumes familiarity with using "Active Directory Users and Computers" to manage group policy.

The client PCs need to be running Windows 2000 SP4, Windows XP SP2, Windows Server 2003 (SP1 or above) or Windows Vista. (Technically this product works with the previous SPs, but we have decided not to approve the full service pack updates for installation as support staff may not wish SP updates to be approved automatically. Some PCs will fail with these updates, e.g. if free hard disk space is too small. In any case you should not be connecting systems with earlier SPs than those listed above to the network. MS does not provide update support for these SPs.)

First, select the Organisational Unit (OU) to which you wish to apply the policy. Then choose an existing Group Policy Object (GPO) to which you wish to add the Auto Update configuration, or alternatively create a new GPO. Open the GPO.


Under Computer Configuration, right-click on Administrative Templates and choose Add/Remove Templates....


You will see a dialog box that looks something like this:


We need to add a new template containing the WSUS settings, so click Add....


We need to add wuau.adm. This may or may not already be present in the \windows\inf folder. If it is present, please check its size. If it is less than 49kB, it's an old version. The newer version of wuau.adm, can be downloaded from here (Windows Policy Template, 50KB) and saved to \windows\inf.

You should now see the wuau.adm template included in the list. Here it's listed with the smaller size (49kB, as opposed to 50kB). Again, if wuau.adm shows up as smaller, you have the wrong version.


Next, expand the tree to get to Computer Configuration/Administrative Templates/Windows Components/Windows Update. Under Windows Update, you should see fifteen policy setting, as shown below. If you only see only two or four, you have loaded an old version of wuau.adm.


Next, expand the tree to get to Computer Configuration/Administrative Templates/Windows Components/Windows Update. Under Windows Update, you should see fifteen policy setting, as shown below. If you only see only two or four, you have loaded an old version of wuau.adm.


This document explains the minimum configuration required to use WSUS; for more information on the other settings, read the description provided by Windows.

We'll start at the top. Double-click on Configure Automatic Updates.

In Configure Automatic Updates Properties, choose Enabled. Choose "4. Auto download and schedule the install"; select an installation day (either "every day", or choose the day of the week on which you'd like updates to take place); select an installation time (the default is 3am; we recommend that you schedule updates for a time when no one is likely to be using the computer, even if you'd expect the computer to be switched off at that time). Click on OK to close the dialog box.


Open the setting Specify intranet Microsoft update service location. In the properties dialog, choose Enabled. Then, set both the intranet update service and the intranet statistics server to http://is-wsus.bris.ac.uk/ as shown below. Click on OK to close the dialog box.


This version of WSUS can be set to update Microsoft Office packages (Office XP(2002), 2003, 2007) in addition to Windows itself. This is optional and will not happen unless you select it as follows. If you wish to use WSUS to keep Microsoft Office packages (Office XP(2002), 2003, 2007) updated, you can configure the WSUS client to install Office updates as follows (provided that Office was installed from an unpatched original copy): Open the setting Enable client-side targeting. In the properties dialog, choose Enabled. Then, set the target group name OfficeUpdates as shown below. Click on OK to close the dialog box.


Open the setting Reschedule Automatic Updates scheduled installations. In the properties dialog, choose Enabled. Leave the Wait after system startup setting at five minutes. We suggest that if you do decrease this amount, you set it to no less than two minutes. Click on OK to close the dialog box.


Open the setting No auto-restart for scheduled Automatic Updates installations. In the properties dialog, choose Enabled. This will prevent the computer from restarting automatically after performing updates (and will avoid work being lost).

Open the setting Allow Automatic Updates immediate installation. In the properties dialog, choose Enabled. This will allow the computer to silently install updates that do not interrupt services or require a reboot.


The settings above should allow your computers to automatically stay up to date with security patches and minimise the risk of work being lost.

Windows XP Installation


Windows XP Installation