Showing posts with label Tips. Show all posts

Friday, July 6, 2012

Configure Windows 2008 Core server with a GUI


Windows Server Core is a stripped down version of 2008. It has no explorer, and most GUI functionality is removed.
A great solution when you don’t want any extra software running on a production server.
Soo much is missing that it can get frustrating when you just want to make a few changes before you put the server into production.
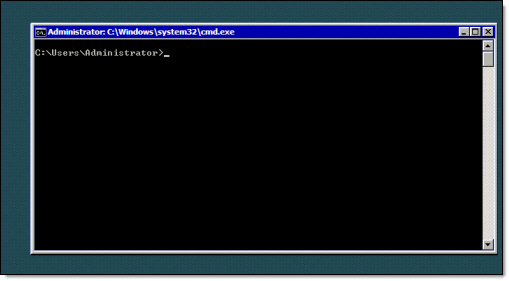
When you boot, it simply launches a command line:
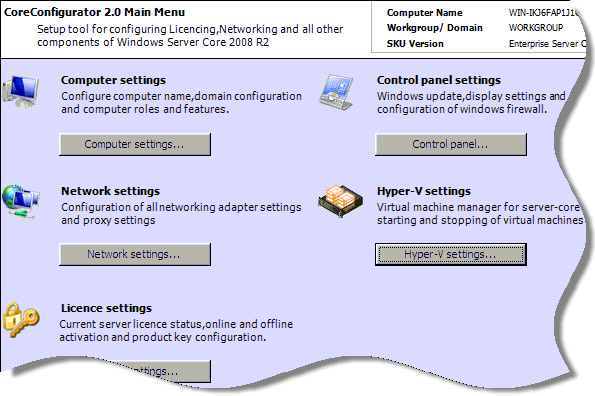
Windows 2008 Core R2 GUI Config
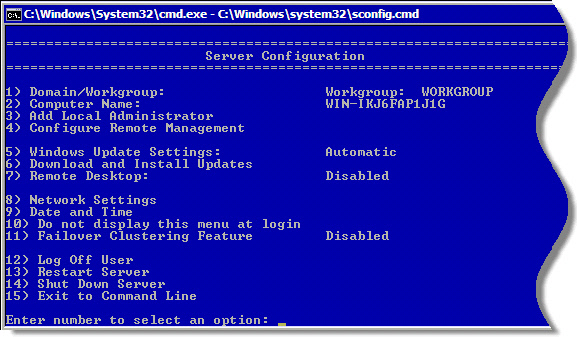
With the latest version, it has improved…they do include a console interface to make configuration changes:
Windows 2008 Core R2 Cmd Line Config
Still, that is too limited, and leaves you frustrated
You end up having to go through a lot of hoops to even make simple changes.
There is an answer to this – The Windows 2008 Server Core Configurator.
It comes in the form of an ISO, so you can burn it to a CD or add it to your VMWare storage.
Once you mount the ISO, or pop in the CD, you can launch it from the command line like this:
start_coreconfig
The first time you run it, it will check to make sure it has all of the software needed to run…namely powershell.
Once it is done, it launches – then you can easily make your configuration changes:
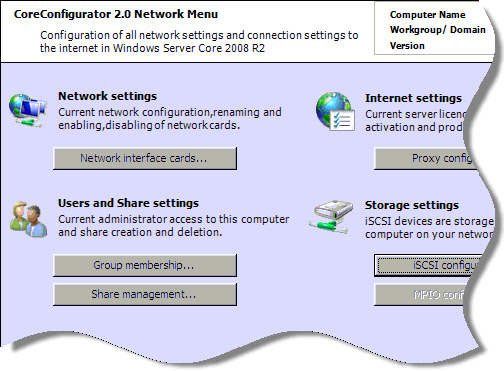
You can change network settings
Windows 2008 Core Server Network Configuration
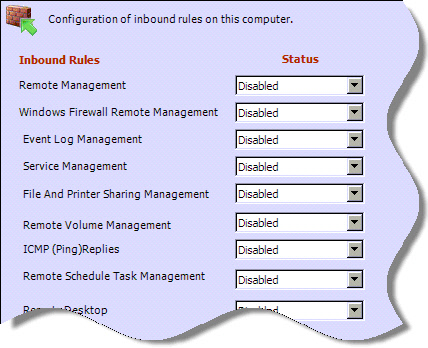
Firewall
Windows 2008 Server Core Firewall Configuration
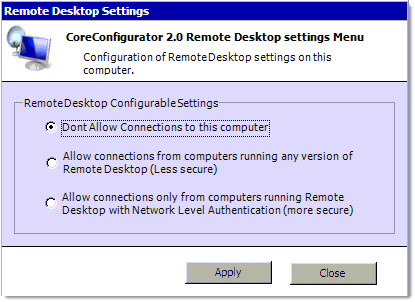
Remote Desktop
Windows 2008 Server Core Remote Desktop Configuration
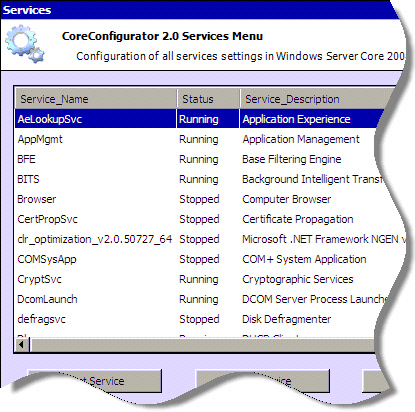
Services
Windows 2008 Server Core Services Configuration
And much more. The best part is, you make your changes pop out the CD and it leaves nothing behind.
You can download it for free from here:

Wednesday, May 30, 2012

Tech For Dummies: Cisco MDS 9100 Series Zoning & EMC VNX Host Add A “How To” Guide" By: Eli Mercado


Before we begin zoning please make sure you have cabled each HBA to both switches assuring the host is connected to each switch. Now let’s get started …
Configuring and Enabling Ports with Cisco Device Manager:
Once your HBAs are connected we must first Enable and Configure the ports.
1. Open Cisco Device Manager to enable port:


2. Type in the IP address, username and password of the first switch:
 
3. Right-click the port you attached FC cable to and select enable:
 http://www.integrateddatastorage.com/wp-content/uploads/2012/04/Blog-3.jpg
Cisco allows the usage of multiple VSANs (Virtual Storage Area Network). If you have created a VSAN other than VSAN 1 you must configure the port for the VSAN you created.
1. To do this, right-click the port you enabled and select “Configure”:
 http://www.integrateddatastorage.com/wp-content/uploads/2012/04/Blog-4.jpg
2. When the following screen appears, click on Port VSAN and select your VSAN, then click “Apply”:
 http://www.integrateddatastorage.com/wp-content/uploads/2012/04/Blog-5.jpg
3. Save your configuration by clicking on “Admin” and selecting “Save Configuration”, once the “Save Configuration” screen pops up and requests you to select “Yes”:
http://www.integrateddatastorage.com/wp-content/uploads/2012/04/Blog-6.jpg
 http://www.integrateddatastorage.com/wp-content/uploads/2012/04/Blog-7.jpg
 Once you have enabled and configured the ports, we can now zone your Hosts HBAs to the SAN.
Login to Cisco Fabric Manager:
1. Let’s begin by opening Cisco Fabric Manager:
 http://www.integrateddatastorage.com/wp-content/uploads/2012/04/Blog-8.jpg
 2. Enter FM server username and password (EMC Default admin; password) , then clock “Login”:
 http://www.integrateddatastorage.com/wp-content/uploads/2012/04/Blog-9-.jpg
3. Highlight the switch you intend to zone and select “Open”:
 http://www.integrateddatastorage.com/wp-content/uploads/2012/04/Blog-10.jpg
4. Expand the switch and right-click “VLAN”, then select “Edit Local Full Zone Database”:
 http://www.integrateddatastorage.com/wp-content/uploads/2012/04/Blog-11.jpg
Creating An FC Alias:
In order to properly manage your zones and HBAs, it is important to create an “FC Alias” for the WWN of each HBA. The following screen will appear:
1. When it does, right-click “FC-Aliases” and select “Insert”, once selected the next screen will appear. Type in the name of the host and HBA ID, example: SQL_HBAO. Click the down arrow and then select the WWN that corresponds to your server, finally click “OK”:
 http://www.integrateddatastorage.com/wp-content/uploads/2012/04/Blog-12.jpg

 http://www.integrateddatastorage.com/wp-content/uploads/2012/04/Blog-12.jpg
Creating Zones:
Now that we have created FC-Aliases, we can now move forward creating zones. Zones are what isolates connectivity among HBAs and targets. Let’s begin creating zones by:
1. Right-clicking on “Zones”.
2. Select “Insert” from the drop down menu. A new screen will appear.
3. Type in the name of the “Zone”, for management purposes use the following format _ Example: SQL01_HBAO_VNX_SPAO.
4. Click “Ohttp://www.integrateddatastorage.com/wp-content/uploads/2012/04/Blog-13.jpgK”:
  Note: These steps must be repeated to zone the hosts HBA to the second storage controller. In our case, VNX_SPB1.
 Adding Members to Zones:
Once the Zones names are created, insert the aliases into the Zones:
5. Right-click on the Zone you created.
6. Select “Insert”, and a new screen will appear.
7. Select “FC-Alias”, click on “…” box then select Host FC Alias.
8. Select the target FC Alias, click “OK”, and click “Add”:
 http://www.integrateddatastorage.com/wp-content/uploads/2012/04/Blog-14.jpg
 http://www.integrateddatastorage.com/wp-content/uploads/2012/04/Blog-15.jpg
Creating Storage Groups:
Now that we have zoned the HBAs to the array, we can allocate storage to your hosts. To do this we must create “Storage Groups”, which will give access to LUNs in the array to the hosts connected to that array. Let’s begin by logging into the array and creating “Storage Groups”:
1. Login to Unisphere and select the array from the dashboard:
 http://www.integrateddatastorage.com/wp-content/uploads/2012/04/Blog-16.jpg
2. Select “Storage Groups” under the Hosts tab:
 http://www.integrateddatastorage.com/wp-content/uploads/2012/04/Blog-17.jpg
3. Click “Create” to create a new storage group:
 http://www.integrateddatastorage.com/wp-content/uploads/2012/04/Blog-18.jpg
4. The following screen will appear, type in the name of the storage group. Typically you will want to use the name of the application or hosts cluster name.
 http://www.integrateddatastorage.com/wp-content/uploads/2012/04/Blog-19.jpg
5. The screen below will pop up, at this time click “Yes” to continue and add LUNs and Hosts to the Storage Group:
 http://www.integrateddatastorage.com/wp-content/uploads/2012/04/Blog-20.jpg
6. The next screen will allow you to select wither newly created LUNs or LUNs that already exist in other Storage Groups. Once you add the LUN or LUNs to the group, click on the hosts tab to continue to add hosts:
 http://www.integrateddatastorage.com/wp-content/uploads/2012/04/Blog-21.jpg
7. In the hosts tab, select the Hosts we previously zoned and click on the forward arrow. Once the host appears in the right pane, click OK:  
 http://www.integrateddatastorage.com/wp-content/uploads/2012/04/Blog-22.jpg
8. At this phttp://www.integrateddatastorage.com/wp-content/uploads/2012/04/Blog-23.jpgoint a new screen will pop up, click YES to commit.

Once you have completed these tasks successfully, your hosts will see new raw devices. From this point on, use your OS partitioning tool to create volumes.
Thursday, April 5, 2012

Smackdown: Which Website Works Better?

A tale of two florists: Same product, same market. Here's why one company wins hands down.


Business has always been about competition. Online, it is competition on steroids.
Depending on which study you read, online attention spans range from four seconds to 10 seconds. With tabbed browsing, online attention spans are getting even shorter. As a result, if your website doesn’t shout your value proposition—particularly if you’re in a highly competitive industry—your visitors are only click of the back button away from a page crammed with your competitors.
So not only do you need to get their attention fast, but also gain their trust. You must communicate who you are, what you do, and what makes you better than your competition.
There are lots of ways to differentiate your business online. Here are four you must master:
  • Have a strong, central message: What’s your elevator pitch? How can you deliver your value proposition in as few words as possible? Get to your point quickly.
  • Avoid huge blocks of text: Your home page is not the place for long, explanatory passages. It is a gateway to your primary content.
  • Avoid clutter: It is important to isolate your central message. Get rid of secondary messages that will only distract.
  • Use clear calls to action: The objective of any business website is to drive consumer behavior. Make sure it is easy and intuitive for your visitors to take the next step.
A tale of two florists
A recent Google search for “New York City florist” came up with pages and pages of results. Let’s take a look at two sites that came up high on page one of Google results.
What happens when you arrive at Big Apple Florist? You tell me. Is there anything about this homepage that makes you want to use their services?
Big Apple Florist
  • Design? On one side, dense copy in a font that’s difficult to read. On the other side? A rather unattractive photograph of an uninspired bouquet.
  • Offer? No clear offer or pricing.
  • Trust? The copy says that they’ve been in business since 1946, but that message is buried in the dense copy. That information should jump out at you.
  • Ease of purchase? It doesn’t even look like a site where you can actually buy flowers.  Most people are in a hurry when buying flowers. There is nothing here that facilitates the buying process.
By way of comparison, take a look at bloomstoday.com:
Bloomstoday
They clearly get the concept of differentiation.
  • Design? Clear and clean with lots of white space. No dense copy, just clear, short offers.
  • Offer? The main image rotates showing offers for birthdays, holidays, sympathy, etc.
  • Differentiation? The 50% discount jumps out. So do the delivery fees.
  • Trust? “Safe and Secure Checkout” right at the top of the page.
Neither of these companies are the industry heavyweights, but one site has managed to get my attention, while the other is a turn-off. Great websites don’t require big budgets—but they absolutely need great messaging.

9 Ways to Get More Out of Google Analytics

Already know and love Google's data tools? Here are nine cool features you may not be using--but should.


You probably already love Google Analytics because it gives you a big picture look at how your website is performing. You probably also love it because it is free and easy to install.
But I have come up with nine more reasons to love Google Analytics. Check out these sophisticated tracking tools you might not even be aware of:

1. Set up "event tracking"

Event Tracking is a feature of Google Analytics you use to track different actions visitors take on your website, such as clicking a button or downloading a file. It is useful for tracking actions on your website that don't take the user to a new page (i.e. clicking play on a video player). This will help you to understand which features and calls to action are being utilized and which are being ignored.

2. Track page load time

If your site is loading slowly, you are guaranteed to be losing traffic. Web users are impatient and have a very short attention span. If your site is loading slowly, get help immediately! Find an expert who can both diagnose and fix the problem.

3. Setting session length to the right amount

By default, a session in Google Analytics is set to 30 minutes. That means that if a user is inactive on your website for over 30 minutes, their next move on your website will be counted as a second visit with a brand new set of pages that will be part of that visit. For some websites it is beneficial to see the entire "flow" of one long visit, regardless of idle time.

4. Create "funnels"

Google Analytics allows you to track the steps visitors take to achieve a specific goal. Let's say your goal is to have a visitor make a purchase of a specific product. The "funnel" is all of the pages that lead a visitor to this desired goal. By listing and tracking your funnel pages, you get great data on where visitors are dropping off (in this case, not making a purchase) along the buying funnel. Armed with this knowledge, you can fix the weak links in the buying chain.

5. Establish "cross-domain tracking"

This helps you to track user behavior in cases where a user is visiting multiple domains you own. This frequently comes into play on e-commerce sites that use a third-party checkout provider. If you fail to set up cross-domain tracking, Google Analytics will not be able to track the entire buying process, ending a session when a user leaves one domain and creating an entirely new session when that user arrives at the second domain.

6. Set up "advanced segments"

This tool provides another way of slicing up your visitors. For example, you can divide visitors into those who came from paid advertising, from organic searches and from directly typing in your domain name. Or perhaps you want to see what new visitors coming to your site after a search query do after landing on a specific page of your website and you wish to track this regularly. This information gives you key data on your paid marketing and SEO efforts.

7. Set Up "campaign tagging"

Wherever you promote your site, whether it's on Google, through a paid advertising campaign, or through social media, you need to create URLs that identify the source and nature of the visit. For example, if you launch an email marketing campaign, you want your URLs linking back to your website to contain various attributes, such as source ("Email to Prospects #4"), medium ("Email"), name ("Email to Prospects 2012"), etc. The data provided by campaign tagging will help you see which marketing and advertising channels are providing the best ROI and which ones either need to be improved or abandoned.

8. Establish "e-commerce tracking"

By enabling e-commerce tracking on Google Analytics and coding your shopping cart's receipt page, your sales revenue data is sent directly to Google Analytics and is available to you in a simple, straight forward report.

9. Filter IP addresses

Certain visits to your website distort your analytics. These include all internal (company) visits and repeat visits from spammers. By using Google Analytics to filter these IP addresses out of the equation, you get a purer set of visitor stats.
Whether you have someone in the company who really understands Google Analytics or hire an outside agency with Google Analytics expertise, get someone one board who can help you set up and monitor all of these valuable tools. Chances are, very few of your competitors are digging deep enough into their data, so the more you do the better off you are.

Saturday, December 3, 2011

Online Tools to Flip Text


Are you bored with standard and ordinary fonts? Then give our upside down writing a try! It’s fresh and new. It’s unique and it adds style to your screen names, Writing upside down has never been this easy!

List Of Online Tools to Flip Text :-

1.) Flip Text.org

2.)UpSide Down Text.com

3.)Facebook Status.org

3.) Flip a Text.com

4.)Flip My Text.com

5.) Flip This Text.com


Offline Tool :-

The program is really easy and it is useful when you want to train your mind, because you will see your data inverted.

  • Basically the program has not limit in inverting your text.
  • This program allow you to invert the order of many words in your written text.
  • You need only to paste your text and you will see your inverted text immediately.

Download

Wednesday, October 5, 2011

Looking for Hacking Tricks: List of Best hacking Articles Published till Date


These days hacking word has become too much popular; and its craze among the users is tremendous… Now even if you are also fond of Hacking Articles then below is the complete list of article you may love to read published on Tricksnhacking.com… Here goes the list Enjoy

Audio sound or Video playback not playing well? Download Audio and video Coecs


Even though the Windows 7 is the most advanced operating system among all the Windows platforms released so far; still there are some problems or lack of options which should has to be there.
One such issue comes with the codecs pack for files like flv or 3gp ooc… etc. as there are not supported natively even by windows 7.
So if you ever have came across such a situation then this codec mentioned will surely help you; This codec pack is is called the Win7codecs, and installing this codec pack ensures that our system gets the following codecs which were missing from it:
amr | mpc | ofr | divx | mka | ape | flac | evo | flv | m4b | mkv | ogg | ogv | ogm | rmvb | xvid
This is very simple to install and it automatically install missing plugins/codecs; integrated into the Windows media player; no third party software required.
You will also start seeing the thumbnails of these file formats after installing this codec pack.
Download Win7codecs

Google Search Trick to Avoid unwanted result: Google Search filter trick


As we all know Google is the best search engine considered today but even though being popular, it always don’t give us the desired result. Today there are millions of millions sites as well as blogs publishing article about the same subject and Google displays result from those sites. Butit is not always that all the web links it displays, we are looking for, but if this is the same situation you came across a lot of time then here is a ip which can help you lot.
Google has several built in functions that will help you make your searches more successful, and to enable you to spend less time searching. Now in this post today I will let you know a tip how you can remove unwanted (unrelated) results from Google Search Result.
 
Ever searched for something before, and had a whole list of completely irrelevant web pages come up? This is annoying at the best of times, as it takes time to check and read through the list of sites and find the one you actually want.
For example, if you were looking for a review of the book “Harry Potter” (whatever part of it), and you typed into Google “Harry Potter review”, many of the links listed are reviews of the movie, not the book. Because you are not looking for a review of the movie, you can remove all pages related to the movie by adding “-movie” to the end of your search terms.
 
 
This will now display all the pages relevant to “Harry Potter review“, but not relevant to ” Harry Potter movie”.
Isn’t this trick amazing… hope you enjoyed reading the article.