Showing posts with label How to. Show all posts

Friday, May 30, 2014

How to Change a File Extension in Windows 7

This page shows you how to change a file extension in Windows. For example, you might want to rename a file called MyDocument.rtf to MyDocument.txt.
These instructions are for Windows 7 but the same basic process applies to most versions of Windows (see screenshots from Windows XP).

NOTE: Changing a file extension should only be done if you are confident it's the right thing to do. Test the file thoroughly after the change. If it doesn't work you can easily change the extension back—just make sure you remember what it was!

My Computer

The first thing to do is open Windows Explorer (or My Computer) and view the file you wish to change. We'll use the example of MyDocument.rtf. When we browse to the file it looks like this:

Windows Explorer
You'll notice that the file does not appear to have an extension—it's just called MyDocument. That's because in this example Windows is set to hide extension names.

If you can already see file extensions on your computer, skip the next step.

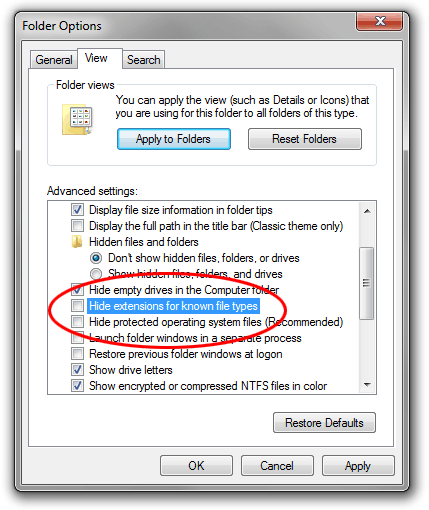
If you can't see the file extension, go to organize > Folder and Search Options, then click the View tab. Uncheck the box titled "Hide extensions for known file types" like so:

Folder Options Window

Click OK. Now you should be able to see the file extension:

Windows Explorer

Right-click the file name and select Rename (or left-click and hold down the button for one second). Enter the new extension like so:

Changing the extension

After entering the new extension, hit the Enter (return) key. Windows will give you a warning that the file may not work properly. This is quite safe—remember that you can restore the original extension if anything goes wrong.
It's also possible that you might get another message telling you that the file is "read-only". In this case either say yes to turning off read-only, or right-click the file, select Properties and uncheck the Read-only box.
If you do not have permission to change the file extension, you may have to login as Administrator. Another option is to make a copy of the file, rename the copy and then delete the original.

Note: Windows treats file extensions as case-insensitive, i.e. .RTF is the same as .rtf. However other operating systems do not, and will treat MyDocument.RTF and MyDocument.rtf as two different files. Therefore it is good practice to always treat your files as case-sensitive for maximum compatibility. This is especially crucial if you are going to use the files on the Internet. We recommend that you get into the habit of using all lower-case letters for all file extensions—then there's no confusion.

How to Setup Nagios 3.4.4 Network Monitoring On Ubuntu Server 12.04/12.10

This guide will shown you how to installing latest version of nagios 3.4.4 on Ubuntu Server 12.04/12.10. Nagios is free and open source tool with GPL License allowing to control and monitor the items and services on a network. When it detects a problem it sends alert messages, either by mail or by other techniques.
Step 1. Before installing Nagios 3.4.4 on Ubuntu Server 12.04/12.10, make sure your Ubuntu Server is up to date. Enter the following commands one by one, and install any available updates:
sudo apt-get update
sudo apt-get upgrade -y
Step 2.  Install Apache 2, PHP5, GCC ( development libraries and compilation), GD ( development libraries) on other package
sudo apt-get install build-essential apache2 php5-gd wget libgd2-xpm libgd2-xpm-dev libapache2-mod-php5 libssl-dev
Step 3. Create users and groups for Nagios:
sudo mkdir -p /etc/nagios /var/nagios
sudo groupadd --system --gid 9000 nagios
sudo groupadd --system --gid 9001 nagcmd
sudo adduser --system --gid 9000 --home /usr/local/nagios nagios
sudo usermod --groups nagcmd nagios
sudo usermod --append --groups nagcmd www-data
sudo chown nagios:nagios /usr/local/nagios /etc/nagios /var/nagios
Step 4. Download the source code of both compressed Nagios and the Nagios plugins (visit http://www.nagios.org/download/ for links to the latest versions). At time of writing, the latest versions of Nagios 3.4.4 and the Nagios plugins 1.4.16
cd /usr/local/src/
wget http://sourceforge.net/projects/nagios/files/nagios-3.x/nagios-3.4.4/nagios-3.4.4.tar.gz
wget http://sourceforge.net/projects/nagiosplug/files/nagiosplug/1.4.16/nagios-plugins-1.4.16.tar.gz
Step 5. Extract, Compile and Install source of nagios 3.4.4
sudo tar -xzvf /usr/local/src/nagios-3.4.4.tar.gz
cd /usr/local/src/nagios
sudo ./configure --sysconfdir=/etc/nagios --localstatedir=/var/nagios --prefix=/usr/local/nagios --with-nagios-user=nagios --with-nagios-group=nagios --with-command-group=nagcmd --with-openssl=/usr/bin/openssl --enable-perl-modules --with-mail=/usr/bin/sendemail
sudo make all
sudo make install
sudo make install-init
sudo make install-config
sudo make install-commandmode
Step 6. Edit file /etc/objects/contacts.cfg to change the email address that is associated with nagiosadmin contact with the email address where you want to be alerted.
sudo nano /etc/objects/contacts.cfg
Example:
define contact{
               contact_name   nagiosadmin ;
               use            generic-contact ;
               alias          Ubuntu Precise ;
               email          admin@ubuntuprecise.net ;
}
Step 7. Edit file /etc/nagios/objects/commands.cfg to change both sendemail references to match the correct sendemail syntax:
sudo nano /etc/nagios/objects/commands.cfg
define command{
 command_name notify-host-by-email
 command_line /usr/bin/printf "%b" "***** Nagios *****\n\nNotification Type: $NOTIFICATIONTYPE$\nHost: $HOSTNAME$\nState: $HOSTSTATE$\nAddress: $HOSTADDRESS$\nInfo: $HOSTOUTPUT$\n\nDate/Time: $LONGDATETIME$\n" | /usr/bin/sendemail -s srv-mail:25 -f "admin <admin@ubuntuprecise.net>" -t $CONTACTEMAIL$ -u "** $NOTIFICATIONTYPE$ Host Alert: $HOSTNAME$ is $HOSTSTATE$ **"
}
define command{
command_name notify-service-by-email
command_line /usr/bin/printf "%b" "***** Nagios *****\n\nNotification Type: $NOTIFICATIONTYPE$\n\nService: $SERVICEDESC$\nHost: $HOSTALIAS$\nAddress: $HOSTADDRESS$\nState: $SERVICESTATE$\n\nDate/Time: $LONGDATETIME$\n\nAdditional Info:\n\n$SERVICEOUTPUT$" | /usr/bin/sendemail -s srv-mail:25 -f "admin <admin@ubuntuprecise.net>" -t $CONTACTEMAIL$ -u "** $NOTIFICATIONTYPE$ Service Alert: $HOSTALIAS$/$SERVICEDESC$ is $SERVICESTATE$ **"
}
Step 7. Now we need to configure Nagios to access it via web interface.
  • Install the web configuration file in the Apache conf.d directory:
cd /usr/local/src/nagios
sudo make install-webconf
  • Create password for Account nagiosadmin to enter the Nagios web interface. Remember the password you assign to this account – you will need it later. then restart apache2 daemon
sudo htpasswd -c /etc/nagios/htpasswd.users nagiosadmin
sudo /etc/init.d/apache2 reload
  • Edit file /etc/apache2/apache2.conf and add the following line:
sudo nano /etc/apache2/apache2.conf
DirectoryIndex index.html index.php index.cgi
Step 8. Check your Nagios 3.4.4 configuration file for errors by typing following command. Look for errors in red
sudo /usr/local/nagios/bin/nagios -v /etc/nagios/nagios.cfg
Step 9. Extract, Compile and install Nagios Plugins 1.4.16
cd /usr/local/src
wget http://prdownloads.sourceforge.net/sourceforge/nagiosplug/nagios-plugins-1.4.16.tar.gz
sudo tar -zxvf /usr/local/src/nagios-plugins-1.4.16.tar.gz
cd /usr/local/src/nagios-plugins-1.4.16
sudo ./configure --sysconfdir=/etc/nagios --localstatedir=/var/nagios --with-nagios-user=nagios --with-nagios-group=nagios
sudo make
sudo make install
Step 10. Set Nagios is started whenever the system boots up, then restart nagios daemon
sudo /usr/sbin/update-rc.d -f nagios defaults 99
sudo ln -s /etc/init.d/nagios /etc/rcS.d/S99nagios
sudo /etc/init.d/nagios restart
If all goes well, we should now be able to enter a Web browser to access Nagios administrator panel. Open a web browser and enter:
http://domain/nagios/
We ask for the username (nagiosadmin) with the password you have chosen in step 7.  If all went well you should see the home page of Nagios Administrator Panel
Link Reference:

Tuesday, July 10, 2012

How to install/upgrade/increase RAM


How to install/upgrade/increase RAM: Every once in a while, I will be posting an easy-to-follow and easy-to-do computer hardware and software tips and tutorials. My main aim is to provide in my own little way some technical help and advice to those who are still lacking the know-how on fixing or doing the most basic computer related tasks.

So here is my first uncomplicated tutorial, and it’s about the proper way of installing RAM:

What is RAM?
RAM is short for Random Access Memory. It is the area where your computer stores programs that you are currently running and data that you are currently working on. RAM is different from disk storage, e.g. hard-drive. Each and every one of your programs and data are held by disk storage whether you are running them or not. The moment you turn off the computer, the contents of RAM will instantaneously disappear, but the contents of your disk storage will remain in tacked. RAM is also different from ROM. ROM (Read Only Memory) are memory chips that have had data stored on them which cannot be changed at all. ROM chips can be usually found on a computer motherboard.

Why upgrade or increase RAM?

The main reason for upgrading RAM is speed. More and faster RAM means quicker and more responsive computer performance. Upgrading RAM is considered as one of the cheapest if not the cheapest way to speed-up a computer.

When to upgrade or increase RAM?

When your computer is running sluggish while performing memory demanding tasks like video and graphics editing, CD/DVD burning, or while running several applications simultaneously, then upgrading RAM is one of the best available solutions.

How to install RAM?
Before adding RAM, be sure to read these important tips and reminders first:

*If you have a new motherboard, check the owner’s manual or manufacturer, this is the sure way to purchase the correct type when you're adding computer RAM.

*If you want to add RAM to your current motherboard, the easiest way is to see which type of RAM you currently have. First open your computer case. Remove your current RAM by pushing down on both of the retaining clips holding the RAM in place. Your RAM should have the type and speed printed on it. That's the type you need!

*You can mix different memory speeds and sizes but not of different types. Like a DDR and DDR2 cannot be used together.

*Stand on uncarpeted flooring to reduce static electricity. Touch as little as possible inside your machine and especially avoid touching any computer chips. Static damage, and even oil from fingertips, may cause a failure months later.

Instead of illustrating the procedures on how to install, upgrade or increase RAM myself, I'm going to refer you to these existing good tutorial sites that can be found here and here. If you have some questions or needed extra help, you can always ask me later thru a comment. And then there’s always Google, when all else fails.

Monday, June 25, 2012

How to Install LimeWire on Ubuntu Linux


LimeWire is a very popular peer-to-peer (P2P) file sharing software among (porn-loving) Windows desktop users :-) So it's no surprise that I receive emails every now and then from people who recently switched to Linux asking me worriedly how they can install and use LimeWire on their newly installed distro (mostly Ubuntu). To make the transition a lot easier for the complete newbies like them, I decided to share this extremely straightforward and quick tutorial on installing LimeWire on Ubuntu Linux:


1. You can start by going to the LimeWire for Linux download page HERE, and then click on the download link.


2. Open the .deb file with the GDebi Package Installer.


3. Complete the download, and then poceed with the installation.


4. If successful, installation should be finished in no time. You can open LimeWire by going to: Applications --> Internet --> LimeWire


5. You are done and as easy as that!


Now enjoy downloading those dirty files (whatever those are) but beware of those destructive PC viruses that could infect and harm your computer and can often lead to insanity.

Friday, June 22, 2012

How to Transfer Emails from One Gmail to Another Gmail Mailbox

If you have two gmail accounts and would like to stop using the old account, you probably will encounter the problem like how to import mails from the old gmail mailbox to another one. Gmail has provided a great feature that allows users to import emails from another mailbox so that you can still keep your important mails in the new gmail mailbox by following the below steps.

1. Login to old gmail account that you would like to transfer mails over to the new gmail account. Click on Setting, then choose Forwarding and POP/IMAP. Under POP Download section, select Enable POP from all mail. Click Save Changes button at bottom to save the setting.

2. Login to new gmail account. Click on Setting follow by Accounts and Import. Under Check mail from other accounts (using POP3) section, click Add a POP3 mail account you own link.

3. At the pop up window, type your old gmail address and click Next Step button.

4. On the next screen, type the old gmail password, then select pop.gmail.com at POP server drop down list. Click Add Account button.

5. You will be asked if you want to send email from this new gmail mailbox using old gmail address. Tick Yes if you want to or else just tick No.

6. If you choose yes, then you will be requested to type your preference name for the old gmail address. If you would like to use old gmail address whenever reply an email from this new account, then click Specify a different “reply-to” address link and enter the old gmail address. Click Next Step button to proceed.

7. Click Send Verification button and gmail will send verification code to your old gmail account. This is to verify if you are the owner for old gmail account.

8. Go to your old gmail account, copy the verification code and paste it into the text box, then click Verify button.

Once you have completed all the above steps, your new gmail will start importing all mails from old gmail account. It will take some times to complete the mails transfer depending on your emails’ capacity.

Note: If you want to transfer the emails which are in other folders (eg. sent, draft, etc) select all the mails in the folder and move to inbox.

Create Ghost Bootup with Network


This trick shows you how create Symantec Ghost bootup floppy disks with Network option. With the network option, you can access the network resources and use the GhostCast feature to perform backup/restore via the network. The instructions based on Ghost 8, but similar procedures can be done on different versions of Ghost.
If you're looking for the instructions how to create a standard Symantec Ghost Bootup (i.e. without Network), click Here instead.
Or if you're looking for the instructions how to create a Ghost Bootup CD from the two floppy disks, click Here instead.
Use this trick at your own risk.

Here's how
  1. Open the "Symantec Ghost Boot Wizard".

  2. Select "Network Boot Disk" and click "Next".

  3. At the screen "Symantec Ghost Boot Wizard - Network Interface Card", select an appropriate driver for your network card. If you need more details on a driver, click on it and select "Modify".
    If you don't see your network card listed, follow the next step to add a new one; otherwise, select your network card and click "Next" (and skip to step 9).


  4. To add a new driver, search and download your driver from the internet. Make sure you download a "DOS" driver. A "Packet Driver" usually comes with a ".COM" file or ".EXE" file. A "NDIS2 driver" usually comes with a ".DOS" file.
  5. Click "Add" on the screen "Symantec Ghost Boot Wizard - Network Interface Card" to bring up the "Template Type" dialog.

    Select "NDIS2 driver" or "Packet Driver" depending on what you have. (You probably have more luck searching a "NDIS2 driver" - file with ".DOS") then click "OK".

  6. At the screen "Template Properties", click on the "Browse..." button and browse to your driver. Then enter a name for "Driver Name". A driver name should be very simple and must end with a "$". For example, you can take the first few letter of your driver file and add the "$":

  7. Click "OK" to go back to the screen "Symantec Ghost Boot Wizard - Network Interface Card"
  8. The "Name" field of the new driver should be editable. Go ahead to change this name the way you want. This name is just to help you recognize it from the list. Then click "Next".

  9. Click "Next" on the next screen to "Use PC-DOS".
  10. On the next screen, you'll need to specify where the file "ghost.exe" is located. This file is normally installed to a path as example below, but you should double check. Then click "Next".

  11. Click "Next" on the next screen to use default options for external storage devices.
  12. On the next screen, you'll need to specify the Tcp/ip options. The Tcp/ip can be either "Automatic IP" (or "DHCP"), or "Static IP".
    If you plan to run Ghost on multiples computer on a same network at a same time (using GhostCast), you should specify a static IP for each CD to avoid conflicting. Otherwise, you can always select "DHCP will assign the IP settings". Then click "Next".
  13. Click "Next" on the next screen:

  14. Click "Next" on the Review screen:

  15. A message will display telling you that you will need two floppy disks. Click "OK".
  16. The Boot Disk Wizard will start to erase your floppy and create the boot data. Once it's done with the first disk, it will prompt for a second one.

Create a Standard Ghost Bootup


This trick shows you how create a standard Symantec Ghost bootup floppy set (i.e. without Network). The "Standard Ghost Boot Disk" option from Symantec Ghost allows you to create a set of 2 bootable floppy disks to use with Ghost tools for backup/restore hard drives and partitions.
The "Standard Ghost Boot Disk" does not allow you to access the network resources (i.e. GhostCast), but it does allow you to read and write from your CD-ROM and DVD drives as well as USB external drives.
If you're looking for the instructions how to create a Network Ghost Bootup, click Here.
Or if you're looking for the instructions how to create a Ghost Bootup CD from the two floppy disks, click Here.
Use this trick at your own risk.

Here's how

  1. Open the "Symantec Ghost Boot Wizard".

  2. Select "Standard Ghost Boot Disk" and click "Next".

  3. Leave the default options as is and click "Next".
    Note that even though you are not selecting the "USB Support" option on this screen, you'll still be able to access your USB external devices. The "USB Support" option here is for "Peer-to-peer".

  4. Click "Next" on the next screen to "Use PC-DOS".
  5. On the next screen, you'll need to specify where the file "ghost.exe" is located. This file is normally installed to a path as example below, but you should double check. Then click "Next".

  6. Click "Next" on the next screen to use default options for external storage devices.
  7. Click "Next" on the next screen:

  8. Click "Next" on the Review screen:

  9. A message will display telling you that you will need two floppy disks. Click "OK".
  10. The Boot Disk Wizard will start to erase your floppy and create the boot data. Once it's done with the first disk, it will prompt for a second one.

Tuesday, June 19, 2012

How to manage .pst files in Microsoft Outlook


How to make a backup copy of a .pst file

If you do not use Outlook with Microsoft Exchange Server, Outlook stores all its data in a .pst file. You can use the backup copy to restore your Outlook data if the original .pst file is damaged or lost. This section explains how to create a copy of your whole .pst file, with all the default items in the file.

Follow these steps to back up the whole .pst file:
  1. Close any messaging programs such as Outlook, Microsoft Exchange, or Microsoft Windows Messaging.
  2. Click Start, and then click Run. Copy and paste (or type) the following command in the Open box, and then press ENTER:
    control panel
    Control Panel opens.

    Note If you see the Pick a category screen, click User Accounts, and then go to step 3.
  3. Double-click the Mail icon.
  4. Click Show Profiles.
  5. Click the appropriate profile, and then click Properties.
  6. Click Data Files.
  7. Under Name, click the Personal Folders Service that you want to back up. By default, this service is called Personal Folders. However, it may be named something else.

    Note If you have more than one Personal Folders Service in your profile, you must back up each set of .pst files separately.

    If there are no entries called Personal Folders and you have not yet stored any information such as messages, contacts, or appointments in Outlook, you probably have not yet enabled the Personal Folders Service. Go to the "References" section for information about how to create a .pst file.

    If you have no Personal Folders Services in your profile and you can store information such as messages, contacts, or appointments in Outlook, your information is probably being stored in a mailbox on an Exchange Server. Try using the instructions in the "How to back up .pst file data that is located on a Microsoft Exchange Server" section.
  8. Click Settings, and then note the path and file name that appears.

    Note Because the .pst file contains all data that is stored in the MAPI folders that Outlook uses, the file can be very large. To reduce the size of the .pst file, click Compact Now in the Settings window.
  9. Close all the Properties windows.
  10. Use Windows Explorer or My Computer to copy the file that you noted in step 8. You can copy the file to another location on the hard disk drive or to any kind of removable storage media, such as a floppy disk, a CD-ROM, a portable hard disk drive, a magnetic tape cassette, or any other storage device.

How to back up .pst file data that is located on a Microsoft Exchange Server

To know how to back up your data if you use Outlook with a Microsoft Exchange Server, you have to know where the data is stored. The default delivery and storage location for Outlook data is the Exchange Server mailbox. The Exchange Server administrator usually handles backups of the mailboxes on the server. However, some Exchange Server administrators store Outlook data in a .pst file on your hard disk drive.

Follow these steps to see where Outlook is currently storing your data:

In Outlook 2010:

  1. Click the File tab on the Outlook ribbon.
  2. In the Info category, click the Account Settings button, and then click Account Settings.
  3. In the Account Settings window, click the Data Files tab.

    If the Location field contains the word "Online" or a path to a file that has the file name extension .ost, Outlook stores data in folders on the Exchange Server. Contact the Exchange Server administrator for more information about how backups are handled.

    If the Location field contains a path to a file that has the file name extension .pst, Outlook stores new messages, contacts, appointments, and other data in a .pst file on your hard disk. To back up the data, go to the "How to make a backup copy of a .pst file" section.

In Outlook 2007:

  1. On the Tools menu, click Options, click the Mail Setup tab, and then click E-mail Accounts.
  2. In the Account Settings window, click the Data Files tab.

    If the Name field contains the word "Mailbox" followed by an e-mail name, Outlook stores data in folders on the Exchange Server. Contact the Exchange Server administrator for more information about how backups are handled.

    If the field contains the words "Personal Folder" or the name of a set of personal folders or .pst files, Outlook stores new messages, contacts, appointments, and other data in a .pst file on your hard disk. To back up the data, go to the "How to make a backup copy of a .pst file" section.

In an earlier version of Outlook:

  1. On the Tools menu, click E-mail Accounts.

    Note This option might be unavailable on some networks. The network administrator might have removed this option to protect the account information. If you do not see the Email Accounts option, contact the network administrator for help.
  2. Click View or Change Existing Email Accounts, and then click Next.
  3. Look at the Deliver new e-mail to the following location option. If the option contains the word "Mailbox" followed by an e-mail name, Outlook stores data in folders on the Exchange Server. Contact the Exchange Server administrator for more information about how backups are handled.

    If the field contains the words "Personal Folder" or the name of a set of personal folders or .pst files, Outlook stores new messages, contacts, appointments, and other data in a .pst file on your hard disk. To back up the data, go to the "How to make a backup copy of a .pst file" section.

How to export .pst file data

If you want to back up only some of your Outlook data, you can create a new backup .pst file of only the data that you want to save. This is also known as exporting .pst file data. For example, you might want to use this section if you have important information in only some folders and you have other, less important items in much larger folders. You can export only the important folders or contacts and omit folders like Sent Mail.

In Outlook 2010:

Follow these steps to export a specific folder:
  1. Click the File tab.
  2. In the Outlook Options window, click Advanced.
  3. Click Export.
  4. In the Import and Export Wizard, click Export to a file, and then click Next.
  5. Click Outlook Data File (.pst), and then click Next.
  6. Select the folder to export, and then click Next.
  7. Click Browse, and then select the location where you want the new .pst file to be saved.
  8. In the File Name box, type the name that you want to use for the new .pst file, and then click OK.
  9. Click Finish.

In an earlier version of Outlook:

  1. Open Outlook.
  2. On the File menu, click Import And Export. If the menu item is not available, move your pointer over the chevrons at the bottom of the menu, and then click Import and Export.
  3. Click Export To File, and then click Next.
  4. Click Personal Folder File (.pst), and then click Next.
  5. Click the folder to which you want to export the .pst file, and then click Next.
  6. Click Browse, and then select the location where you want the new .pst file to be saved.
  7. In the File Name box, type the name that you want to use for the new .pst file, and then click OK.
  8. Click Finish.
Note Folder design properties include permissions, filters, description, forms, and views. If you export items from one .pst file to another, no folder design properties are maintained.

How to import .pst file data into Outlook

You can use the backup copy of your .pst file to restore your Outlook data if the original .pst file is damaged or lost. Everything that is saved in the .pst file is returned to Outlook.

In Outlook 2010:

Follow these steps to restore, or import, your data into Outlook:
  1. Click the File tab.
  2. In the Open category, click Import.
  3. In the Import and Export Wizard, click Import from another program or file, and then click Next.
  4. Click Outlook Data File (.pst), and then click Next.
  5. Type the path and the name of the .pst file that you want to import, or click Browse to choose the file to import.

    Note Under Options, it is recommended that you click Do not import duplicates, unless you want the imported information to replace or duplicate items that are already in Outlook.
  6. Click Next.
  7. Select the folder that you want to import. To import everything in the .pst file, select the top of the hierarchy.

    Note The top folder (usually Personal Folders, Outlook Data File or your email address) is selected automatically. Include subfolders is selected by default. All folders under the folder selected will be imported
  8. Click Finish.

In earlier versions of Outlook:

Follow these steps to restore, or import, your data into Outlook:
  1. If the .pst file that you want to import is stored on a removable device, such as a floppy disk, a portable hard disk drive, a CD-ROM, a magnetic tape cassette, or any other storage medium, insert or connect the storage device, and then copy the .pst file to the hard disk drive of the computer.

    When you copy the .pst file, make sure that the Read-Only attribute is not selected. If this attribute is selected, you might receive the following error message:
    The specified device, file, or path could not be accessed. It may have been deleted, it may be in use, you may be experiencing network problems, or you may not have sufficient permission to access it. Close any application using this file and try again.
    If you receive this error message, clear the Read-Only attribute, and then copy the file again.
  2. Open Outlook.
  3. On the File menu, click Import And Export. If the command is not available, move the pointer over the chevrons at the bottom of the menu, and then click Import and Export.
  4. Click Import from another program or file, and then click Next.
  5. Click Personal Folder File (.pst), and then click Next.
  6. Type the path and the name of the .pst file that you want to import, and then click Next.
  7. Select the folder that you want to import. To import everything in the .pst file, select the top of the hierarchy.
  8. Click Finish.

How to transfer Outlook data from one computer to another computer

You cannot share or synchronize .pst files between one computer and another computer. However, you can still transfer Outlook data from one computer to another computer.

Use the instructions in the "How to make a backup copy of a .pst file" section to copy the .pst file to a CD or DVD-ROM or other portable media, or copy the file to another computer over a LAN/WAN link.

Note Connecting to .pst files over LAN/WAN links is not supported, and problems connecting to .pst files over such links can occur. See the following article for more information:

297019  (http://support.microsoft.com/kb/297019/EN-US/ ) Personal folder files are unsupported over a LAN or over a WAN link

You might also want to create a new, secondary .pst file that is intended for transferring data only. Save the data that you want to transfer in this new .pst file and omit any data that you do not want to transfer. If you need to make a secondary .pst file to store data for transfer between two different computers, or for backup purposes, use the following steps.

In Outlook 2010:

  1. Click the File tab.
  2. In the Info category, click the Account Settings button, and then click Account Settings.
  3. In the Account Settings window, click the Data Files tab.
  4. Click Add, click Outlook data file (.pst), and then click OK.
  5. Type a unique name for the new pst. file. For example, type Transfer.pst, and then click OK.
  6. Close Outlook.

In earlier versions of Outlook:

  1. On the File menu, point to New, and then click Outlook Data File.
  2. Type a unique name for the new .pst file. For example, type Transfer.pst, and then click OK.
  3. Type a display name for the Personal Folders file, and then click OK.
  4. Close Outlook.
Follow these steps to copy an existing .pst file:
  1. Use the instructions in the "How to make a backup copy of a .pst file" section to make a backup copy of the .pst file that you want to transfer. Make sure that you copy the backup .pst file to a CD-ROM or to another kind of removable media.
  2. Copy the backup .pst file from the removable media to the second computer.
  3. Follow the steps in the "How to import .pst file data into Outlook" section to import the .pst file data into Outlook on the second computer.

How to back up Personal Address Books

Your Personal Address Book might contain e-mail addresses and contact information that is not included in an Outlook Address Book or contact list. The Outlook Address Book can be kept either in an Exchange Server mailbox or in a .pst file. However, the Personal Address Book creates a separate file that is stored on your hard disk drive. To make sure that this address book is backed up, you must include any files that have the .pab extension in your backup process.

Follow these steps to locate your Personal Address Book file:
  1. If you are running Windows Vista: Click Start.

    If you are running Windows XP: Click Start, and then click Search.

    If you are running Windows 95 or Windows 98: Click Start, point to Find, and then click Files or Folders.

    If you are running Windows 2000 or Windows Millennium Edition (Me): Click Start, point to Search, and then click For Files or Folders.
  2. Type *.pab, and then press ENTER or click Find Now.

    Note the location of the .pab file. Use My Computer or Windows Explorer to copy the .pab file to the same folder or storage medium that contains the backup of the .pst file.
You can use this backup to restore your Personal Address Book to your computer or to transfer it to another computer. Follow these steps to restore the Personal Address Book:
  1. Close any messaging programs, such as Outlook, Microsoft Exchange, or Windows Messaging.
  2. Click Start, and then click Run. Copy and paste (or type) the following command in the Open box, and then press ENTER:
    control panel
    Control Panel opens.

    Note If you see the Pick a category screen, click User Accounts.
  3. Double-click the Mail icon.
  4. Click Show Profiles.
  5. Click the appropriate profile, and then click Properties.
  6. Click Email Accounts.
  7. Click Add a New Directory or Address Book, and then click Next
  8. Click Additional Address Books, and then click Next.
  9. Click Personal Address Book, and then click Next.
  10. Type the path and the name of the Personal Address Book file that you want to restore, click Apply, and then click OK.
  11. Click Close, and click then OK.
Note The Outlook Address Book is a service that the profile uses to make it easier to use a Contacts folder in a Mailbox, Personal Folder File, or Public Folder as an e-mail address book. The Outlook Address Book itself contains no data that has to be saved.

How to use the Personal Folder Backup utility to automate the backup of .pst files

Microsoft has released a utility to automate the backup of your personal folders (.pst) file. To download the utility, visit the following Microsoft Web site:
http://www.microsoft.com/downloads/details.aspx?FamilyId=8B081F3A-B7D0-4B16-B8AF-5A6322F4FD01&displaylang=en (http://www.microsoft.com/downloads/details.aspx?FamilyId=8B081F3A-B7D0-4B16-B8AF-5A6322F4FD01&displaylang=en)
For more information about the Personal Folder Backup utility, click the following article number to view the article in the Microsoft Knowledge Base:
238782  (http://support.microsoft.com/kb/238782/ ) How to automatically backup your personal folders file
Note In Microsoft Outlook 2010, the Personal Folders backup add-in is disabled by default. For more information, click the following article number to view the article in the Microsoft Knowledge Base:
2030523  (http://support.microsoft.com/kb/2030523/ ) How to enable Personal Folders Backup add-in to work with Outlook 2010


How to back up Outlook settings files


If you have customized settings, such as toolbar settings and Favorites, that you want to replicate on another computer or restore to your computer, you might want to include the following files in your backup:
  • Outcmd.dat: This file stores toolbar and menu settings.
  • ProfileName.fav: This is your Favorites file, which includes the settings for the Outlook bar (only applies to Outlook 2002 and older versions).
  • ProfileName.xml: This file stores the Navigation Pane preferences (only applies to Outlook 2003 and newer versions).
  • ProfileName.nk2: This file stores the Nicknames for AutoComplete.
  • Signature files: Each signature has its own file and uses the same name as the signature that you used when you created it. For example, if you create a signature named MySig, the following files are created in the Signatures folder:
    • MySig.htm: This file stores the HTML Auto signature.
    • MySig.rtf: This file stores the Microsoft Outlook Rich Text Format (RTF) Auto signature.
    • MySig.txt: This file stores the plain text format Auto signature.
    The location of the signature files depends on the version of Windows that you are running. Use this list to find the appropriate location:
    • Windows Vista or Windows 7: Drive\users\Username\appdata, where Drive represents the drive that Outlook was installed to and Username represents the user name that Outlook was installed under.
    • Windows XP or Windows 2000: Drive\Documents and Settings\Username\Local Settings\Application Data\Microsoft\Outlook, where Drive represents the drive that Outlook was installed to and Username represents the user name that Outlook was installed under.
    • Windows 98 or Windows Me: Drive\Windows\Local Settings\Application Data, where Drive represents the drive that Outlook was installed to.
Note If you use Microsoft Word as your e-mail editor, signatures are stored in the Normal.dot file as AutoText entries. You should back up this file also.

How to find a .pst file

If you do not know where an old or existing .pst file resides on your computer and you want to add this .pst file to your Outlook profile, this section explains how to search for the .pst file and then add it to your Outlook profile.

To search for the .pst file, follow these steps:
  1. To search for the .pst files:
    • If you are running Windows Vista: Click Start, and then click Computer. Locate the search window in the top-right corner.
    • If you are running Windows XP: Click Start, and then click Search.
    • If you are running Windows 95 or Windows 98: Click Start, point to Find, and then click Files or Folders.
    • If you are running Windows 2000 or Microsoft Windows Millennium Edition: Click Start, point to Search, and then click For Files or Folders.
  2. Type *.pst, and then press Enter or click Find Now. Locate the desired .pst file you want to add to Outlook. Record the location of the .pst file.
  3. Close the search window and start Outlook.
    • If you are running Outlook 2010, click the File tab, and then click Account Settings in the Info category. Click Account Settings again, and then click the Data Files tab in the window that appears.
    • If you are running Outlook 2007 or earlier, click the File menu, and then select Data File Management.
  4. Click the Add button, and then choose the correct type of .pst file to add. If your .pst file was created in Outlook 2007, choose Office Outlook Personal Folders File (.pst). If your .pst file was created in an older version of Outlook, such as Outlook 97, 2000, or XP, choose Outlook 97-2002 Personal Folders File (.pst).
  5. Navigate to the location of the desired .pst file that you found during your search above. Select the .pst file, and then click OK.
  6. Type a custom name for the .pst file or accept the default name. Click OK. Click Close to exit the current window.
Outlook now displays that .pst file in the Outlook folder list.

NEXT STEPS
If these methods did not help you, you might want to ask someone you know for he...

If these methods did not help you, you might want to ask someone you know for help. Or, if you use Outlook with Exchange Server, you might want to contact the Exchange Server administrator for help. You can also use the Microsoft Customer Support Services Web site to find other solutions. Some services that the Microsoft Customer Support Services Web site provides include the following:
  • Searchable Knowledge Base (http://support.microsoft.com/search/?adv=1) : Search technical support information and self-help tools for Microsoft products.
  • Solution Centers (http://support.microsoft.com/select/?target=hub) : View product-specific frequently asked questions and support highlights.
  • Microsoft Customer Support Newsgroups (http://www.microsoft.com/communities/newsgroups/default.mspx) : Contact counterparts, peers, and Microsoft Most Valuable Professionals (MVPs).
  • Other Support Options (http://support.microsoft.com/default.aspx?pr=csshome) : Use the Web to ask a question, contact Microsoft Customer Support Services, or provide feedback.
If you continue to have questions after you use these Microsoft Web sites or if you cannot find a solution on the Microsoft Support Services Web site, click the following link to contact Support.
http://support.microsoft.com/contactus (http://support.microsoft.com/contactus)

Basic Linux Command-line Tips and Tricks

1.  Everything in Linux is a file including the hardware and even the directories.
2. # : Denotes the super(root) user
3.  : Denotes the normal user
4.  /root: Denotes the super user’s directory
/home: Denotes the normal user’s directory.
5.  Switching between Terminals
§  Ctrl + Alt + F1-F6: Console login
§  Ctrl + Alt + F7: GUI login
6.  The Magic Tab: Instead of typing the whole filename if the unique pattern for a particular file is given then the remaining characters need not be typed and can be obtained automatically using the Tab button.
7.   ~(Tilde): Denotes the current user’s home directory
8.   Ctrl + Z: To stop a command that is working interactively without terminating it.
9.  Ctrl + C: To stop a command that is not responding. (Cancellation).
10.  Ctrl + D: To send the EOF( End of File) signal to a command normally when you see ‘>’.
11.  Ctrl + W: To erase the text you have entered a word at a time.
12.  Up arrow key: To redisplay the last executed command. The Down arrow key can be used to print the next command used after using the Up arrow key previously.
13.  The history command can be cleared using a simple option –c (clear).
14.  cd :   The cd command can be used trickily in the following ways:
cd : To switch to the home user
cd * : To change directory to the first file in the directory (only if the first file is a directory)
cd .. : To move back a folder
cd - : To return to the last directory you were in
15.  Files starting with a dot (.) are a hidden file.
16.   To view hidden files: ls -a
17.   ls: The ls command can be use trickily in the following ways:
ls -lR : To view a long list of all the files (which includes directories) and their subdirectories recursively .
ls *.* : To view a list of all the files with extensions only.
18.   ls -ll: Gives a long list in the following format
drwxr-xr-x 2 root root 4096 2010-04-29 05:17 bin where
drwxr-xr-x : permission where d stands for directory, rwx stands for owner privilege, r-x stands for the group privilege and r-x stands for others permission respectively.
Here r stands for read, w for write and x for executable.
2=> link count
root=>owner
root=>group
4096=> directory size
2010-04-29=>date of creation
05:17=> time of creation
bin=>directory file(in blue)

The color code of the files is as follows:
Blue: Directory file
White: Normal file
Green: Executable file
Yellow: Device file
Magenta: Picture file
Cyan: link file
Red: Compressed file
File Symbol
-(Hyphen) : Normal file
d=directory
l=link file
b=Block device file
c=character device file
19.  Using the rm command: When used without any option the rm command deletes the file or directory ( option -rf) without any warning. A simple mistake like rm / somedir instead of rm /somedir can cause major chaos and delete the entire content of the /(root) directory. Hence it is always advisable to use rm command with the -i(which prompts before removal) option. Also there is no undelete option in Linux.
20.  Copying hidden files: cp .* (copies hidden files only to a new destination)
21. dpkg -l : To get a list of all the installed packages.
23. Use of ‘ > ‘ and ‘ >> ‘ : The ‘ > ‘ symbol ( input redirector sign) can be used to add content to a file when used with the cat command. Whereas ‘ >> ‘ can be used to append to a file. If the ‘ >> ‘ symbol is not used and content is added to a file using only the ‘>’ symbol the previous content of the file is deleted and replaced with the new content.
e.g: $ touch text (creates an empty file)
$ cat >text
This is text’s text. ( Save the changes to the file using Ctrl +D)
$cat >> text
This is a new text. (Ctrl + D)
Output of the file:
This is text’s text.
This is a new text.

23.  To count the number of users logged in : who |wc –l

24.  cat:  The cat command can be used to trickly in the following way:
- To count no. of lines from a file : cat |wc -l
- To count no. of words from a file : cat |wc -w
To count no. of characters from a file : cat |wc –c

25.  To search a term that returns a pattern: cat |grep [pattern]

26.  The ‘tr’ command: Used to translate the characters of a file.
tr ‘a-z’ ‘A-Z’ <text >text1 : The command for example is used to translate all the characters from lower case to upper case of the ‘text’ file and save the changes to a new file ‘text1′.
27.  File permission using chmod: ‘chmod’ can be used directly to change the file permission of files in a simple way by giving the permission for root, user and others in a numeric form where the numeric value are as follows:
r(read-only)=>4
w(write)=>2
x(executable)=>1
e.g. chmod 754 text will change the ownership of owner to read, write and executable, that of group to read and executable and that of others to read only of the text file.
28.  more: It is a filter for paging through text one screenful at a time.
Use it with any of the commands after the pipe symbol to increase readability.
e.g. ls -ll |more
29.  cron : Daemon to execute scheduled commands. Cron enables users to schedule jobs (commands or shell scripts) to run periodically at certain times or dates.
1 * * * * echo “hi” >/dev/tty1 displays the text “hi” after every 1 minute in tty1
.—————- minute (0 – 59)
| .————- hour (0 – 23)
| | .———- day of month (1 – 31)
| | | .——- month (1 – 12) OR jan,feb,mar,apr …
| | | | .—– day of week (0 – 7) (Sunday=0 or 7) OR sun,mon,tue,wed,thu,fri,sat
* * * * * command to be executed
Source of example: Wikipedia
30.  fsck: Used for file system checking. On a non-journaling file system the fsck command can take a very long time to complete. Using it with the option -c displays a progress bar which doesn’t increase the speed but lets you know how long you still have to wait for the process to complete.
e.g. fsck -C
31.  To find the path of the commandwhich command
e.g. which clear
32. Setting up alias: Enables a replacement of a word with another string. It is mainly used for abbreviating a system command, or for adding default arguments to a regularly used command
e.g. alias cls=’clear’ => For buffer alias of clear
33.  The du (disk usage) command can be used with the option -h to print the space occupied in human readable form. More specifically it can be used with the summation option (-s).
e.g. du -sh /home summarizes the total disk usage by the home directory in human readable form.
34.  Two or more commands can be combined with the && operator. However the succeeding command is executed if and only if the previous one is true.
e.g. ls && date lists the contents of the directory first and then gives the system date.
35.  Surfing the net in text only mode from the terminal: elinks [URL]
e.g: elinks www.google.com
Note that the elinks package has to be installed in the system.
36.  The ps command displays a great more deal of information than the kill command does.
37.  To extract a no. of lines from a file:
e.g head -n 4 abc.c is used to extract the first 4 lines of the file abc.c
e.g tail -n 4 abc.c is used to extract the last 4 lines of the file abc.c
38.  Any changes to a file might cause loss of important data unknowingly. Hence    Linux creates a file with the same name followed by ~ (Tilde) sign without the recent changes. This comes in really handy when playing with the configuration files as some sort of a backup is created.
39.   A variable can be defined with an ‘=’ operator. Now a long block of text can be assigned to the variable and brought into use repeatedly by just typing the variable name preceded by a $ sign instead of writing the whole chunk of text again and again.
e.g ldir=/home/my/Desktop/abc
cp abcd $ldir copies the file abcd to /home/my/Desktop/abc.
40. To find all the files in your home directory modified or created today:
e.g. find ~ -type f -mtime 0