Showing posts with label windows 7. Show all posts

Friday, May 30, 2014

Windows Command Prompt

Occasionally you might need to use the Windows Command Prompt to enter a particular command. This can be a little intimidating if you've never done it before but it's actually very simple. Hopefully you've been given instructions so all you need to do is open the window, type or paste your command, and hit the Enter key on your keyboard.

To open the Command Prompt window:

Windows Command Prompt


Windows 7:

  1. Click the Start button.
  2. In the Search Programs and Files field, type "Command Prompt" and hit Enter.

Windows 8:

  1. Open the search charm and enter "Command Prompt".

Tips

  • Be extremely careful when typing commands. Triple-check that your spelling is absolutely 100% correct, including any punctuation and spaces. Even one single wrong character or space can cause a lot of damage.
  • You can copy commands from elsewhere and paste them into the prompt window. After copying the text, right-click inside the prompt window and select Paste.

How to Change a File Extension in Windows 7

This page shows you how to change a file extension in Windows. For example, you might want to rename a file called MyDocument.rtf to MyDocument.txt.
These instructions are for Windows 7 but the same basic process applies to most versions of Windows (see screenshots from Windows XP).

NOTE: Changing a file extension should only be done if you are confident it's the right thing to do. Test the file thoroughly after the change. If it doesn't work you can easily change the extension back—just make sure you remember what it was!

My Computer

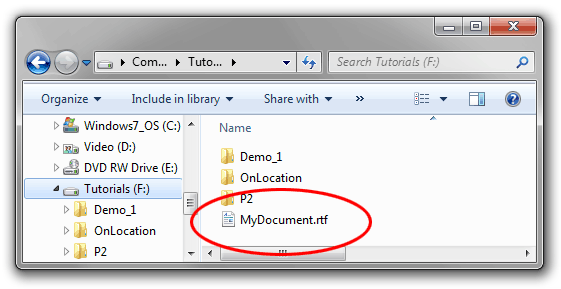
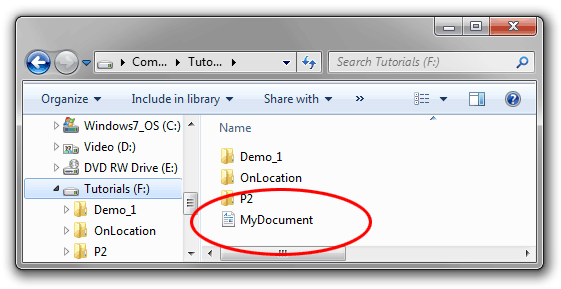
The first thing to do is open Windows Explorer (or My Computer) and view the file you wish to change. We'll use the example of MyDocument.rtf. When we browse to the file it looks like this:

Windows Explorer
You'll notice that the file does not appear to have an extension—it's just called MyDocument. That's because in this example Windows is set to hide extension names.

If you can already see file extensions on your computer, skip the next step.

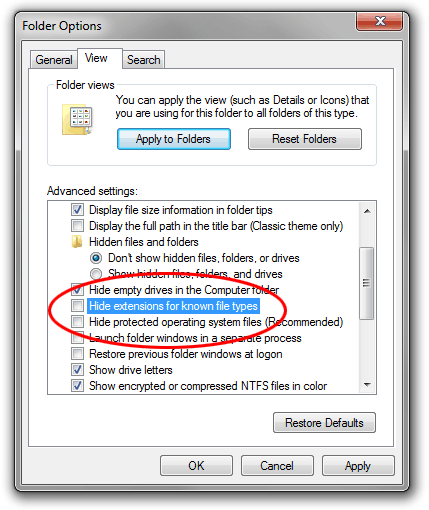
If you can't see the file extension, go to organize > Folder and Search Options, then click the View tab. Uncheck the box titled "Hide extensions for known file types" like so:

Folder Options Window

Click OK. Now you should be able to see the file extension:

Windows Explorer

Right-click the file name and select Rename (or left-click and hold down the button for one second). Enter the new extension like so:

Changing the extension

After entering the new extension, hit the Enter (return) key. Windows will give you a warning that the file may not work properly. This is quite safe—remember that you can restore the original extension if anything goes wrong.
It's also possible that you might get another message telling you that the file is "read-only". In this case either say yes to turning off read-only, or right-click the file, select Properties and uncheck the Read-only box.
If you do not have permission to change the file extension, you may have to login as Administrator. Another option is to make a copy of the file, rename the copy and then delete the original.

Note: Windows treats file extensions as case-insensitive, i.e. .RTF is the same as .rtf. However other operating systems do not, and will treat MyDocument.RTF and MyDocument.rtf as two different files. Therefore it is good practice to always treat your files as case-sensitive for maximum compatibility. This is especially crucial if you are going to use the files on the Internet. We recommend that you get into the habit of using all lower-case letters for all file extensions—then there's no confusion.

Monday, June 25, 2012

Change or Reset Windows Password from a Ubuntu Live CD

If you can’t log in even after trying your twelve passwords, or you’ve inherited a computer complete with password-protected profiles, worry not – you don’t have to do a fresh install of Windows. We’ll show you how to change or reset your Windows password from a Ubuntu Live CD.
This method works for all of the NT-based version of Windows – anything from Windows 2000 and later, basically. And yes, that includes Windows 7.
Note: If you have files on your hard disk encrypted using built-in Windows encryption, they may not be available after changing the Windows password using this method. Exercise caution if you have important encrypted files.
You’ll need a Ubuntu 9.10 Live CD, or a bootable Ubuntu 9.10 Flash Drive. If you don’t have one, or have forgotten how to boot from the flash drive, check out our article on creating a bootable Ubuntu 9.10 flash drive.
The program that lets us manipulate Windows passwords is calledchntpw. The steps to install it are different in 32-bit and 64-bit versions of Ubuntu.

Installation: 32-bit
Open up Synaptic Package Manager by clicking on System at the top of the screen, expanding the Administration section, and clicking on Synaptic Package Manager.


chntpw is found in the universe repository. Repositories are a way for Ubuntu to group software together so that users are able to choose if they want to use only completely open source software maintained by Ubuntu developers, or branch out and use software with different licenses and maintainers.
To enable software from the universe repository, click on Settings > Repositories in the Synaptic window.

Add a checkmark beside the box labeled “Community-maintained Open Source software (universe)” and then click close.


 When you change the repositories you are selecting software from, you have to reload the list of available software. In the main Synaptic window, click on the Reload button.


The software lists will be downloaded.


Once downloaded, Synaptic must rebuild its search index. The label over the text field by the Search button will read “Rebuilding search index.” When it reads “Quick search,” type chntpw in the text field. The package will show up in the list.


Click on the checkbox near the chntpw name. Click on Mark for Installation.


chntpw won’t actually be installed until you apply the changes you’ve made, so click on the Apply button in the Synaptic window now.

You will be prompted to accept the changes. Click Apply.

The changes should be applied quickly. When they’re done, click Close.

chntpw is now installed! You can close Synaptic Package Manager. Skip to the section titled Using chntpw to reset your password.


Installation: 64-bit
The version of chntpw available in Ubuntu’s universe repository will not work properly on a 64-bit machine. Fortunately, a patched version exists in Debian’s Unstable branch, so let’s download it from there and install it manually.
Open Firefox. Whether it’s your preferred browser or not, it’s very readily accessible in the Ubuntu Live CD environment, so it will be the easiest to use. There’s a shortcut to Firefox in the top panel.

Navigate tohttp://packages.debian.org/sid/amd64/chntpw/download and download the latest version of chntpw for 64-bit machines.
Note: In most cases it would be best to add the Debian Unstable branch to a package manager, but since the Live CD environment will revert to its original state once you reboot, it’ll be faster to just download the .deb file.

 Save the .deb file to the default location.


You can close Firefox if desired. Open a terminal window by clicking on Applications at the top-left of the screen, expanding the Accessories folder, and clicking on Terminal.


In the terminal window, enter the following text, hitting enter after each line:


cd Downloads sudo dpkg –i chntpw*


chntpw will now be installed.
Using chntpw to reset your password
Before running chntpw, you will have to mount the hard drive that contains your Windows installation. In most cases, Ubuntu 9.10 makes this simple.
Click on Places at the top-left of the screen. If your Windows driveis easily identifiable – usually by its size – then left click on it.


If it is not obvious, then click on Computer and check out each hard drive until you find the correct one.

The correct hard drive will have the WINDOWS folder in it. When you find it, make a note of the drive’s label that appears in the menu bar of the file browser.

If you don’t already have one open, start a terminal window by going to Applications > Accessories > Terminal.

In the terminal window, enter the commands
cd /media
ls
pressing enter after each line. You should see one or more strings of text appear; one of those strings should correspond with the string that appeared in the title bar of the file browser earlier.
Change to that directory by entering the command
cd
Since the hard drive label will be very annoying to type in, you can use a shortcut by typing in the first few letters or numbers of the drive label (capitalization matters) and pressing the Tab key. It will automatically complete the rest of the string (if those first few letters or numbers are unique).

We want to switch to a certain Windows directory. Enter the command:


cd WINDOWS/system32/config/
Again, you can use tab-completion to speed up entering this command.

To change or reset the administrator password, enter:


sudo chntpw SAM
SAM is the file that contains your Windows registry. You will see some text appear, including a list of all of the users on your system.


 At the bottom of the terminal window, you should see a prompt that begins with “User Edit Menu:” and offers four choices. We recommend that you clear the password to blank (you can always set a new password in Windows once you log in). To do this, enter “1” and then “y” to confirm.

If you would like to change the password instead, enter “2”, then your desired password, and finally “y” to confirm. 

If you would like to reset or change the password of a user other than the administrator, enter:


sudo chntpw –u SAM


From here, you can follow the same steps as before: enter “1” to reset the password to blank, or “2” to change it to a value you provide.


And that’s it!

Conclusion
chntpw is a very useful utility provided for free by the open source community. It may make you think twice about how secure the Windows login system is, but knowing how to use chntpw can save your tail if your memory fails you two or eight times!

Friday, June 22, 2012

Tips And Tricks To Speed up windows 7

With the launch of windows 7 we have witnessed one of the fastest operating system by Microsoft.But still there are people who want more and more!.This article is for all those people who want to increase the performance/speed of their windows 7 operating system. We are giving you tips and tricks to tweak your windows 7 according to your needs and you will certainly get your desired performance from your windows 7 operating system.Here is the step by step tutorial with screenshots on how to increase your windows 7 speed .

1.Disable Startup Services
Windows startup services can be found by clicking on start and the and typing “ msconfig ” and pressing enter.Now click on services tab.Now you can disable the unwanted services by checking them and clicking on disable.While this should be done according to your requirements.Services like “Offline Files,” “Tablet PC Input Services,” Terminal Services,” “Fax” and “Windows Search. “Offline Files,” “Tablet PC Input Services,” Terminal Services,” “Fax” and “Windows Search have a large impact on windows 7 speed/performance.

2.Utilize Readyboast
Microsoft introduced readyboast service with the launch of windows vista and continued the service in windows 7.In ready boast service whenever you plugin your pendrive into your computer you will get an option to use your pendrive to speed up your windows 7 or windows vista.It will increase your windows memory.By using ready boast you can also specify how much memory of the pendrive should be used to speed up your windows 7.

3.Disable Windows transparency
Disabling the windows 7 transparency option will certainty give a good speed to your windows 7 speed/performance.Disabling transparency is very easy in windows 7.Simply right-click on your desktop, select “Personalize,” choose the active theme and then navigate to “Windows Color.” Finally, uncheck the “Enable Transparency” option.

4.Remove Unwanted Programs from Startup
Disabling unwanted programs such as messengers or other programs from startup will not only increase speed of your windows 7 it will also decrease the startup time of windows 7.

5.Disable Unwanted Features Of Windows 7
To disable unwanted features from windows 7 click on “ Start “ then on control panel.Now click on “ Programs “ then on “Turn Windows features on or off”.Now disable the features you think you dont want.We recommend you to disable the “ Indexing Service “ it will have a noticeable effect on the speed.

6.Defragment Your Windows Regularly
Adding and deleting files from drives will make your drives fragmented and it will take longer to access files so defragmenting the drive will decrease file access time.To start defragmentation click on “ Start “ and type “ Disk Defragmenter “ And press enter.Now start the defragmentation.

Friday, December 9, 2011

Windows 7 consumer security software providers


Some companies use products that appear to be antivirus programs to install viruses or malware on your computer. When you install the program, you might also be installing the virus or other malware, without knowing it. Many companies, including those listed on this page, distribute antivirus programs. You should carefully investigate the source of antivirus and other products before downloading and installing them.
The companies listed below provide consumer security software that is compatible with Windows 7. Just click the company name to see the Windows 7-compatible product they offer. For business security software that is compatible with Windows 7, please visit the Windows 7 Compatibility Center or contact your security vendor of choice.
Important: Before you install antivirus software, check to make sure you don't already have an antivirus product on your computer. If you do, be sure to remove the product you don't want before you install the new one. It can cause problems on your computer to have two different antivirus products installed at the same time.
Microsoft is actively working with the partners listed on this page and additional security independent software vendors (ISVs) to provide security software solutions tested on Windows 7.
  • Prevx
  • Quick Heal
  • Norman
  • Symantec
  • ArcaBit
  • ESET
  • Avast!
  • Bullguard
  • DrWeb
  • Trend Micro
  • F-Secure
  • Gdata
  • K7 Computing
  • PC Tools
  • AVG
  • Sunbelt Software
  • Microsoft Security Essentials
  • Zone Alarm
  • ESCAN
  • Emsisoft
  • Avira
  • Panda Security
  • Comodo
  • McAfee
  • ca
  • Bit Defender
  • UnThreat
  • Ahn Lab
  • Rising
  • Kaspersky Lab